INDEX
INTRODUCTION
Enumeration is the active and passive process of collecting information about a target. Unlike OSINT, which is purely passive, enumeration often involves active probing such as scans. Enumeration is iterative: each discovery can lead to new paths and data to explore.
Targets include domains, IP addresses, services, and other components of a system. Once identified, each service must be analyzed to understand its role in the organization’s operations, security posture, and potential exposure. Penetration testers should first understand how the infrastructure works rather than immediately attempting attacks.
To structure enumeration efforts, pentesters should consider not only what is visible but also what is hidden. Critical insights often come from recognizing what isn't immediately obvious. The following guiding questions help refine this mindset:
- What can we see?
- What reasons can we have for seeing it?
- What image does what we see create for us?
- What do we gain from it?
- How can we use it?
- What can we not see?
- What reasons can there be that we do not see?
- What image results for us from what we do not see?
These principles help highlight gaps in understanding rather than technique. Enumeration is less about exploitation and more about observation and deduction. Exceptions exist, but the methodology remains consistent.
| No. | Principle |
|---|---|
| 1 | There is more than meets the eye. Consider all points of view. |
| 2 | Distinguish between what we see and what we do not see. |
| 3 | There are always ways to gain more information. Understand the target. |
Complex processes like enumeration require a standardized methodology to prevent omissions and maintain consistency. Given the unpredictable nature of target systems, many penetration testers rely on personal habits or familiar techniques. However, these are not standardized and often depend solely on individual experience.
Since penetration testing is inherently dynamic, our approach must accommodate this flexibility. For this reason, a static enumeration methodology has been developed for both external and internal tests. This model incorporates dynamic elements and can adapt to different environments while offering a structured foundation. The methodology is organized into six nested layers, symbolizing boundaries that enumeration attempts to cross. Additionally, the overall enumeration process is divided into three distinct levels, allowing for a scalable and progressive analysis of any system.
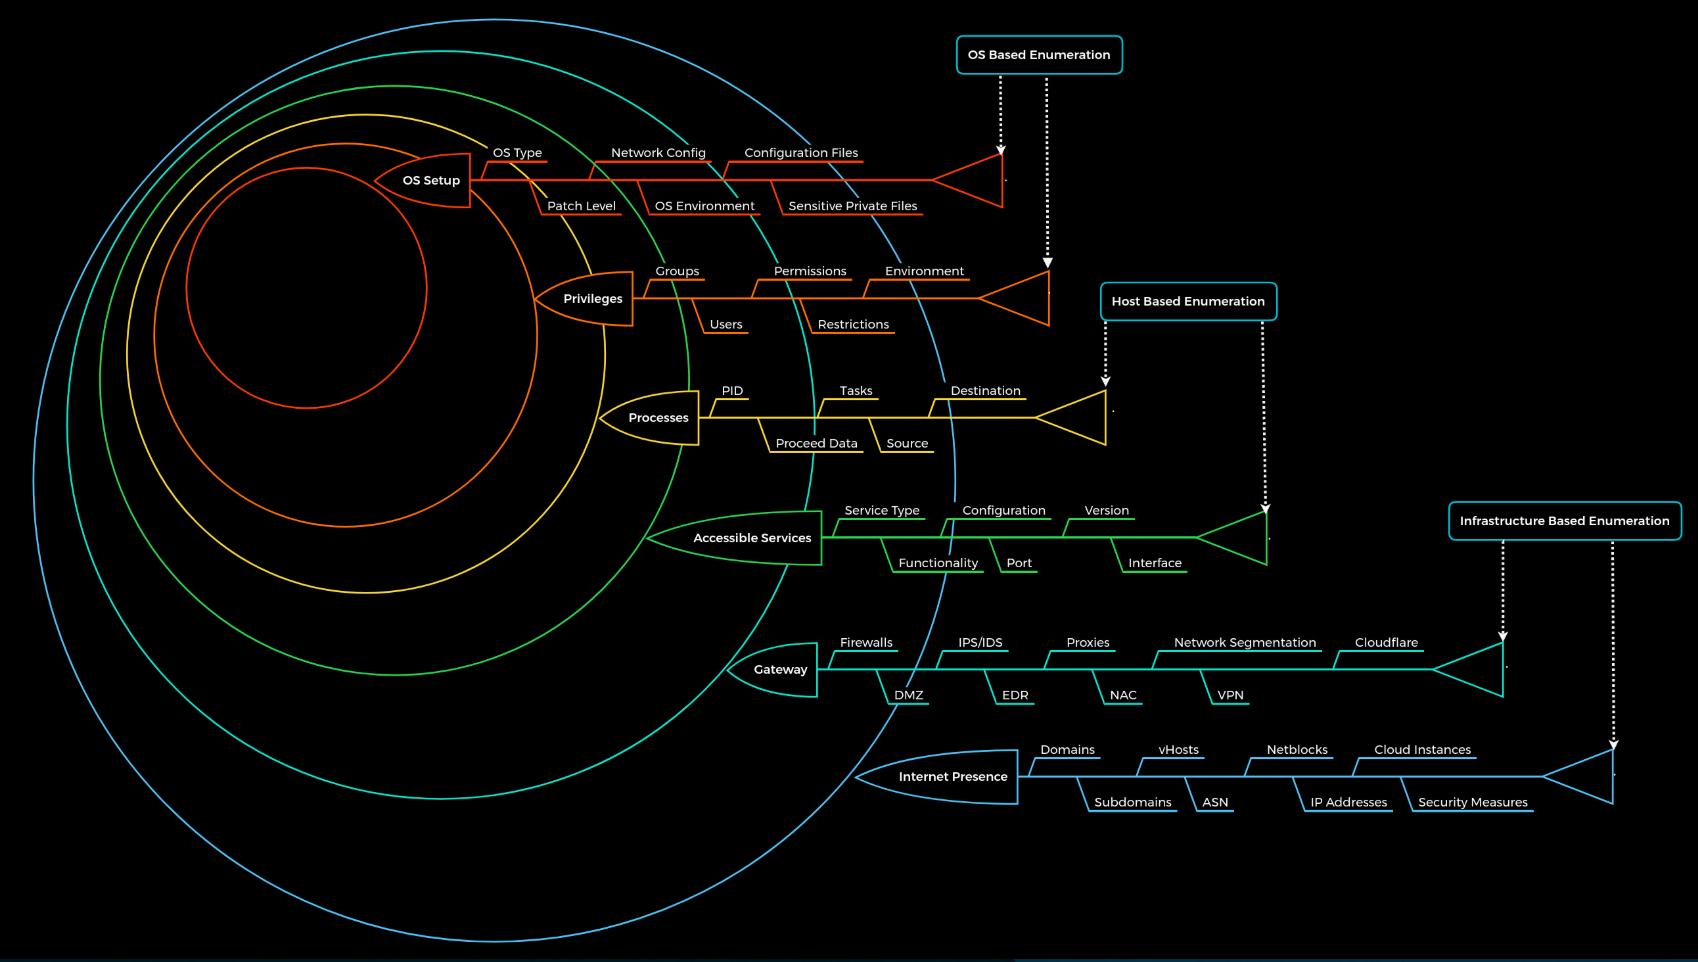
Note: Each layer includes major categories of information but not exhaustive lists. Also, Layer 1 and 2 (Internet Presence and Gateway) apply mostly to external enumeration; internal infrastructure such as Active Directory will be addressed separately.
| Layer | Description | Information Categories |
|---|---|---|
| 1. Internet Presence | Identification of internet presence and externally accessible infrastructure. | Domains, Subdomains, vHosts, ASN, Netblocks, IP Addresses, Cloud Instances, Security Measures |
| 2. Gateway | Identify the possible security measures protecting the infrastructure. | Firewalls, DMZ, IPS/IDS, EDR, Proxies, NAC, Network Segmentation, VPN, Cloudflare |
| 3. Accessible Services | Identify externally or internally accessible services and interfaces. | Service Type, Functionality, Configuration, Port, Version, Interface |
| 4. Processes | Identify internal processes associated with the services. | PID, Processed Data, Tasks, Source, Destination |
| 5. Privileges | Analyze the permissions and access rights linked to services. | Groups, Users, Permissions, Restrictions, Environment |
| 6. OS Setup | Identify system configurations and sensitive internal components. | OS Type, Patch Level, Network Config, OS Environment, Configuration Files, Private Files |
The enumeration process can be visualized as navigating a labyrinth. The objective is to find the quickest and most efficient path inward—looking for weak points rather than forcing access blindly. Strategic insight often yields better results than brute effort.
Layer No. 1: Internet Presence
In this first layer, we focus on identifying all possible targets visible from the Internet. This includes
discovering domains, subdomains, netblocks, and other externally available components. If the scope allows
hunting for additional hosts beyond the predefined ones, this layer becomes even more valuable. The goal is
to
map all externally reachable assets and interfaces relevant to the organization.
Layer No. 2: Gateway
This layer aims to understand how the reachable targets are protected and what entry barriers exist. This
includes analyzing perimeter defenses like firewalls, proxies, and segmentation mechanisms. Due to its
complexity, detailed analysis of gateways is covered in separate modules. The goal is to understand the
protection mechanisms in place and what potential attack surfaces or limitations we face.
Layer No. 3: Accessible Services
We analyze all the services that are accessible on the target systems. Each service fulfills a specific
purpose, configured by the system administrator for a reason. Understanding these services and how they work
is crucial for further interaction or exploitation. This layer is central to this module, focusing on
interpreting service behavior and communication logic.
Layer No. 4: Processes
At this point, we inspect internal data flow—what is executed, by whom, and what data is processed or
transferred. Every triggered function or command initiates a process with a defined task, source, and
destination. Understanding these dependencies gives us insight into system logic and internal interactions.
Layer No. 5: Privileges
Services run under specific users with assigned permissions. Often, overlooked privileges open potential
attack vectors. This is especially true in environments like Active Directory. Identifying who has what
rights
allows us to assess privilege misuse or privilege escalation possibilities. The objective is to map access
rights and understand operational boundaries.
Layer No. 6: OS Setup
This final layer explores the target’s operating system, patch levels, configurations, and internal files.
It
reflects how well the systems are managed and what sensitive internal data may be exposed. This gives us a
window into the security hygiene and administrative practices of the organization.
Infrastructure
Domain Information
Domain information is a critical part of any penetration test. It goes beyond discovering subdomains—it involves understanding the company’s full Internet presence. This includes identifying the technologies and structures required for the company to deliver its services efficiently. This information is gathered passively, avoiding direct interaction with the target systems. By behaving like regular visitors or customers, we avoid detection and maintain anonymity. This approach aligns with OSINT practices and forms the initial step of any external assessment.
Passive OSINT involves leveraging third-party platforms and public resources, but the first and most valuable source is often the company’s own website. By analyzing its structure and written content, we can infer what services are offered and what technical backends support them. For example, companies offering app development, IoT, hosting, or cybersecurity likely use a specific tech stack, each with its own potential weaknesses. When encountering unfamiliar services, it’s essential to research their nature, structure, and operational context. This helps build a clearer picture of the company’s internal infrastructure and its technological dependencies. This approach reflects the first and second enumeration principles: we analyze what we can see (e.g., services) and also what we cannot see directly (e.g., their underlying functionality). Adopting a developer’s point of view helps us reverse-engineer the logic and setup behind public-facing services, providing valuable insight for enumeration.
Once we gain a basic understanding of a company's services and structure, we can begin analyzing its online presence. In black-box penetration tests—where only a list of in-scope targets is provided—this stage becomes critical, as all further details must be discovered independently.
One of the first indicators of a company’s presence is its SSL certificate. Examining the main domain’s certificate can reveal additional DNS names (subdomains) that may also be active and valid for testing. For example:
- Certificate Validity: May 18, 2021 – April 6, 2022
- DNS Names: inlanefreight.htb, www.inlanefreight.htb, support.inlanefreight.htb
Another powerful source for discovering subdomains is crt.sh. This service provides access to Certificate Transparency logs, which are tamper-proof logs of issued SSL certificates. As defined by RFC 6962, all certificates issued by trusted Certificate Authorities are logged to allow verification and detection of unauthorized certificates. Crt.sh results can also be retrieved in JSON format using the following command:
$ curl -s https://crt.sh/\?q\=domain_name.com\&output\=json | jq . If needed, we can also have them filtered by the unique subdomains.
$ curl -s https://crt.sh/\?q\=domain_name.com\&output\=json | jq . | grep name | cut -d":" -f2 | grep -v "CN=" | cut -d'"' -f2 | awk '{gsub(/\\n/,"\n");}1;' | sort -uNext, we can identify the hosts directly accessible from the Internet and not hosted by third-party providers. This is because we are not allowed to test the hosts without the permission of third-party providers.
$ for i in $(cat subdomainlist);do host $i | grep "has address" | grep inlanefreight.com | cut -d" " -f1,4;doneSupose we have the following subdomainlist, that we obtained from crt.sh:
account.ttn.inlanefreight.com
blog.inlanefreight.com
bots.inlanefreight.com
console.ttn.inlanefreight.com
ct.inlanefreight.com
data.ttn.inlanefreight.com
*.inlanefreight.com
inlanefreight.com
integrations.ttn.inlanefreight.com
iot.inlanefreight.com
mails.inlanefreight.com
marina.inlanefreight.com
marina-live.inlanefreight.com
matomo.inlanefreight.com
next.inlanefreight.com
noc.ttn.inlanefreight.com
preview.inlanefreight.com
shop.inlanefreight.com
smartfactory.inlanefreight.com
ttn.inlanefreight.com
vx.inlanefreight.com
www.inlanefreight.com
The output of the command will be:
$ for i in $(cat subdomainlist);do host $i | grep "has address" | grep inlanefreight.com | cut -d" " -f1,4 >> ip-addresses.txt;done
blog.inlanefreight.com 10.129.24.93
inlanefreight.com 10.129.27.33
matomo.inlanefreight.com 10.129.127.22
www.inlanefreight.com 10.129.127.33
s3-website-us-west-2.amazonaws.com 10.129.95.250
Once potential hosts and associated IP addresses are identified, we can enrich this data with tools like Shodan. Shodan scans the Internet for devices and services with open TCP/IP ports and classifies them based on protocols and banners. Shodan is especially useful for identifying Internet-exposed systems such as surveillance cameras, servers, smart home devices, industrial controllers, traffic management systems, and various networking components. Commonly scanned services include HTTP/HTTPS, FTP, SSH, SNMP, Telnet, RTSP, and SIP. Here we can see the example given by HTB for the inlanefreight.com domain:
$ for i in $(cat subdomainlist);do host $i | grep "has address" | grep inlanefreight.com | cut -d" " -f4 >> ip-addresses.txt;done
$ for i in $(cat ip-addresses.txt);do shodan host $i;done
10.129.24.93
City:                    Berlin
Country:                 Germany
Organization:            InlaneFreight
Updated:                 2021-09-01T09:02:11.370085
Number of open ports:    2

Ports:
     80/tcp nginx
    443/tcp nginx


10.129.27.33
City:                    Berlin
Country:                 Germany
Organization:            InlaneFreight
Updated:                 2021-08-30T22:25:31.572717
Number of open ports:    3

Ports:
     22/tcp OpenSSH (7.6p1 Ubuntu-4ubuntu0.3)
     80/tcp nginx
    443/tcp nginx
        |-- SSL Versions: -SSLv2, -SSLv3, -TLSv1, -TLSv1.1, -TLSv1.3, TLSv1.2
        |-- Diffie-Hellman Parameters:
                Bits:          2048
                Generator:     2


10.129.27.22
City:                    Berlin
Country:                 Germany
Organization:            InlaneFreight
Updated:                 2021-09-01T15:39:55.446281
Number of open ports:    8

Ports:
     25/tcp
        |-- SSL Versions: -SSLv2, -SSLv3, -TLSv1, -TLSv1.1, TLSv1.2, TLSv1.3
     53/tcp
     53/udp
     80/tcp Apache httpd
     81/tcp Apache httpd
    110/tcp
        |-- SSL Versions: -SSLv2, -SSLv3, -TLSv1, -TLSv1.1, TLSv1.2
    111/tcp
    443/tcp Apache httpd
        |-- SSL Versions: -SSLv2, -SSLv3, -TLSv1, -TLSv1.1, TLSv1.2, TLSv1.3
        |-- Diffie-Hellman Parameters:
                Bits:          2048
                Generator:     2
                Fingerprint:   RFC3526/Oakley Group 14
    444/tcp


10.129.27.33
City:                    Berlin
Country:                 Germany
Organization:            InlaneFreight
Updated:                 2021-08-30T22:25:31.572717
Number of open ports:    3

Ports:
     22/tcp OpenSSH (7.6p1 Ubuntu-4ubuntu0.3)
     80/tcp nginx
    443/tcp nginx
        |-- SSL Versions: -SSLv2, -SSLv3, -TLSv1, -TLSv1.1, -TLSv1.3, TLSv1.2
        |-- Diffie-Hellman Parameters:
                Bits:          2048
                Generator:     2
Now, we can display all the available DNS records where we might find more hosts. For this we can use the dig command, which is a powerful DNS lookup tool. It allows us to query DNS servers for information about domain names, including their associated IP addresses, mail servers, and other DNS records. The command can be used to retrieve various types of DNS records, such as A (address IPv4), MX (mail exchange responsible for managing the emails for the company ), CNAME (canonical name), TXT (often contains verification keys for different third-party providers and other security aspects of DNS, such as SPF, DMARC, and DKIM, which are responsible for verifying and confirming the origin of the emails sent), NS (name server), SOA (start of authority) or AAAA(address IPv6) records.
$ dig any inlanefreight.comany: is the query type → it requests "all available information" for that name.$ ; <<>> DiG 9.16.1-Ubuntu <<>> any inlanefreight.com
;; global options: +cmd
;; Got answer:
;; ->>HEADER<<- opcode: QUERY, status: NOERROR, id: 52058
;; flags: qr rd ra; QUERY: 1, ANSWER: 17, AUTHORITY: 0, ADDITIONAL: 1
;; OPT PSEUDOSECTION:
; EDNS: version: 0, flags:; udp: 65494
;; QUESTION SECTION:
;inlanefreight.com. IN ANY
;; ANSWER SECTION:
inlanefreight.com. 300 IN A 10.129.27.33
inlanefreight.com. 300 IN A 10.129.95.250
inlanefreight.com. 3600 IN MX 1 aspmx.l.google.com.
inlanefreight.com. 3600 IN MX 10 aspmx2.googlemail.com.
inlanefreight.com. 3600 IN MX 10 aspmx3.googlemail.com.
inlanefreight.com. 3600 IN MX 5 alt1.aspmx.l.google.com.
inlanefreight.com. 3600 IN MX 5 alt2.aspmx.l.google.com.
inlanefreight.com. 21600 IN NS ns.inwx.net.
inlanefreight.com. 21600 IN NS ns2.inwx.net.
inlanefreight.com. 21600 IN NS ns3.inwx.eu.
inlanefreight.com. 3600 IN TXT " MS=ms92346782372" inlanefreight.com. 21600 IN
TXT "atlassian-domain-verification=IJdXMt1rKCy68JFszSdCKVpwPN" inlanefreight.com. 3600 IN
TXT "google-site-verification=O7zV5-xFh_jn7JQ31" inlanefreight.com. 300 IN
TXT "google-site-verification=bow47-er9LdgoUeah" inlanefreight.com. 3600 IN
TXT "google-site-verification=gZsCG-BINLopf4hr2" inlanefreight.com. 3600 IN
TXT "logmein-verification-code=87123gff5a479e-61d4325gddkbvc1-b2bnfghfsed1-3c789427sdjirew63fc"
inlanefreight.com. 300 IN
TXT "v=spf1 include:mailgun.org include:_spf.google.com include:spf.protection.outlook.com include:_spf.atlassian.net ip4:10.129.24.8 ip4:10.129.27.2 ip4:10.72.82.106 ~all"
inlanefreight.com. 21600 IN SOA ns.inwx.net. hostmaster.inwx.net. 2021072600 10800 3600 604800 3600 ;; Query
time: 332 msec ;; SERVER: 127.0.0.53#53(127.0.0.53) ;; WHEN: Mi Sep 01 18:27:22 CEST 2021 ;; MSG SIZE rcvd:
940What we could see so far were entries on the DNS server, which at first glance did not look very interesting (except for the additional IP addresses). However, we could not see the third-party providers behind the entries shown at first glance. The core information we can see now is:
| Service | Associated Entry |
|---|---|
| Atlassian | atlassian-domain-verification |
| Google Gmail | google-site-verification |
| LogMeIn | logmein-verification-code |
| Mailgun | SPF include: mailgun.org |
| Outlook | SPF include: spf.protection.outlook.com |
| INWX | MS=ms92346782372 (possible ID/username) |
| Internal IPs | 10.129.24.8, 10.129.27.2, 10.72.82.106 |
Atlassian tools are commonly used for software development and collaboration (e.g., Jira, Confluence). If unfamiliar, testers should explore the platform to understand its components and interaction logic.
Google Gmail indicates the company uses Google Workspace for email. This might imply the existence of shared GDrive files or links that could be accessible without authentication.
LogMeIn provides centralized remote access. If an attacker obtains admin credentials—possibly through password reuse—it could lead to full infrastructure access. Its importance as a single point of compromise makes it a high-priority finding.
Mailgun suggests that the company sends emails via programmable APIs or SMTP relays. This is a great lead to look for vulnerable API endpoints (e.g., IDOR, SSRF, insecure methods like PUT/POST).
Outlook usage implies Microsoft 365 services such as OneDrive or Azure file storage, which may expose SMB interfaces or unprotected cloud documents if misconfigured.
INWX is a hosting provider and domain registrar. The TXT record containing
MS=ms92346782372 likely serves as domain verification and could resemble the account ID or
login
identifier for management access.
Cloud Resources
The use of cloud platforms like AWS, GCP, and Azure is now fundamental for modern organizations. They provide centralized infrastructure and accessibility for remote teams. However, while cloud providers secure their infrastructure, companies remain responsible for their own configurations—and misconfigurations can introduce serious vulnerabilities. A common misconfiguration involves public access to cloud storage (e.g., AWS S3 buckets, Azure blobs, GCP cloud storage). If not properly secured, these may be accessed without authentication.
Discovered Cloud-Linked Hosts
Often, internal cloud storage is added to DNS for convenience, making it easier for employees to access. In the following example, s3-website-us-west-2.amazonaws.com is linked to an internal IP, confirming use of AWS-hosted resources.
| Host | IP Address |
|---|---|
| blog.inlanefreight.com | 10.129.24.93 |
| inlanefreight.com | 10.129.27.33 |
| matomo.inlanefreight.com | 10.129.127.22 |
| www.inlanefreight.com | 10.129.127.33 |
| s3-website-us-west-2.amazonaws.com | 10.129.95.250 |
Enumerating Cloud Resources via Google Dorks
One of the most common and effective techniques for discovering cloud-hosted files is through Google Dorks. These allow us to search for publicly exposed files stored in cloud environments:
inurl:amazonaws.com– finds public files on AWS.inurl:blob.core.windows.net– finds Azure Blob Storagecontent.- inurl:/admin/index.php username=admin&password=password
These searches may reveal PDFs, documents, presentations, code, and even configuration files. Some may
also be
embedded in website source code via <link rel="dns-prefetch"> or
crossorigin
attributes.
| Operator | Description | Example |
|---|---|---|
site: |
Restrict results to a specific domain | site:github.com |
inurl: |
Find pages with a specific keyword in the URL | inurl:admin |
intitle: |
Search for keywords in the page title | intitle:"index of" |
intext: |
Find pages containing specific text | intext:"confidential" |
filetype: |
Search for specific file types | filetype:pdf |
cache: |
View Google's cached version of a page | cache:example.com |
ext: |
Alternative to filetype (for extensions) | ext:log |
* |
Wildcard operator | site:*.edu |
- |
Exclude specific terms | login -facebook |
Third-Party Tools
Domain.glass offers insight into domain metadata, social links, DNS names, and even Cloudflare security assessments. For example, a “Safe” status confirms the presence of perimeter protections, which should be noted under Layer 2: Gateway.
GrayHatWarfare is a powerful search engine for indexed AWS, Azure, and GCP buckets. It allows sorting by file type and keyword. After finding possible buckets with Google, GrayHatWarfare can be used to explore them passively.
Company Naming Patterns
Companies often use abbreviations in their cloud subdomains and infrastructure. Searching by these
abbreviations increases the chances of discovering hidden or internal cloud resources. Search results may
include file listings, often revealing filenames like id_rsa or config.json.
Danger: Leaked Private Keys
Occasionally, sensitive keys such as private SSH keys are mistakenly uploaded to public
storage. A leaked id_rsa file may allow full access to internal servers if authorized. These
files may appear in Google results, GrayHatWarfare, or within the cloud buckets themselves.
-----BEGIN RSA PRIVATE KEY-----
MIIEpAIBAAKCAQEAx...
...
-----END RSA PRIVATE KEY-----
FTP
File Transfer Protocol (FTP) is one of the oldest protocols still used on the Internet.
Operating at the application layer of the TCP/IP stack—like HTTP and POP—it allows users to upload and
download files between a client and server.
FTP connections use two channels:
FTP supports two modes of operation:
FTP commands vary across implementations but typically allow clients to upload, download, delete, or manage
files and directories. Servers respond with status codes indicating success or failure. These codes follow a
known standard. Most FTP servers require credentials, but some may allow anonymous
FTP—enabling
unauthenticated users to access or upload files. This can be a significant security risk and is usually
restricted to read-only public content.
Trivial File Transfer Protocol (TFTP) is a stripped-down version of FTP that operates over
UDP instead of TCP. It provides basic file transfer functionality but lacks user authentication and many
features present in FTP. TFTP is considered unreliable and insecure due to:
Due to its lack of security, TFTP is only recommended for use in internal, protected
networks. It is often used in scenarios like router firmware updates or PXE boot environments
where
simplicity and automation are prioritized. Let us take a look at a few commands of TFTP:
Unlike FTP, the TFTP client does not support directory listing or navigation commands. It
is
limited to direct file transfers based on known filenames and locations.
One of the most commonly used FTP servers on Linux is vsFTPd (Very Secure FTP Daemon). Its
default configuration is stored in /etc/vsftpd.conf.
vsFTPd is just one of many available FTP servers. While others offer more advanced functionality, vsFTPd is
ideal for learning and demonstrating basic and secure FTP configuration in a clear way. The configuration
file
contains numerous commented lines. Only a subset of all possible options are shown there; the full set can
be
found using
The file
Any user listed in this file will be blocked from authenticating to the FTP server. This is often used as a
basic layer of user restriction.
FTP servers, including vsFTPd, allow numerous settings that may introduce security risks.
These are often enabled for ease of file sharing in internal networks but should never be used in exposed
environments. One of the most critical risks is allowing anonymous login.
Here are some common vsFTPd configuration options that enable anonymous access:
Once these settings are enabled, a user can log in using
From an enumeration perspective, anonymous FTP may reveal directory structures, filenames, and sometimes
sensitive internal documents. Even if download is restricted, file names alone can inform further attack
vectors.
Some additional FTP client commands, like debug and trace, can help us
uncover more
information during a session. These commands are useful for enumeration as they expose server responses and
FTP operations in greater detail.
The
Another useful feature is
Downloading and uploading files is fundamental in FTP enumeration. This capability becomes dangerous in
environments with LFI (Local File Inclusion) vulnerabilities or where FTP
logs are monitored and parsed insecurely—potentially leading to Remote Command Execution
(RCE).
For recursive downloads of the entire FTP directory, we can use
Files are downloaded into a local folder named after the IP:
If write permissions are enabled, we can upload files using the
Footprinting with tools like Nmap is essential to identify services and gather detailed
information about them, even when running on non-standard ports. Nmap includes the Nmap Scripting
Engine (NSE), which provides a powerful set of scripts for probing and fingerprinting services
like
FTP.
A scan using version detection
NSE scripts like Introduction
Command
Description
connectSets the remote host and optionally the port for file transfers.
getTransfers a file or files from the remote host to the local machine.
putTransfers a file or files from the local machine to the remote host.
quitExits the TFTP session.
statusDisplays the current TFTP session status, including transfer mode and time-out settings.
verboseToggles verbose mode on/off for detailed transfer information.
Default Settings
man vsftpd.conf.
Common vsFTPd Settings
Setting
Description
listen=NORun from
inetd instead of as a standalone daemon.
listen_ipv6=YESListen for connections on IPv6.
anonymous_enable=NODisable anonymous FTP login.
local_enable=YESAllow local system users to log in via FTP.
dirmessage_enable=YESShow messages in directories upon entry.
use_localtime=YESUse server’s local time instead of UTC.
xferlog_enable=YESEnable logging of file transfers.
connect_from_port_20=YESData transfers use port 20 (standard).
secure_chroot_dir = /var/run/vsftpd/emptyChroot jail directory used for security.
pam_service_name=vsftpdPAM service to use for authentication.
rsa_cert_file=...Path to SSL certificate for encrypted connections.
rsa_private_key_file=...Path to the corresponding private key.
ssl_enable=NODisables SSL (can be enabled for FTPS).
Restricted Users -
/etc/ftpusers/etc/ftpusers defines which users are denied access to the FTP
service—even if they exist on the system.
guest
john
kevin
Dangerous Settings
Setting
Description
anonymous_enable=YESAllows anonymous login to the server.
anon_upload_enable=YESAllows anonymous users to upload files.
anon_mkdir_write_enable=YESAllows anonymous users to create directories.
no_anon_password=YESSkips password prompt for anonymous login.
anon_root=/home/username/ftpSets the root directory for anonymous users.
write_enable=YESEnables commands like
STOR, DELE, MKD, etc.ftp and the username
anonymous. This is often acceptable in trusted internal environments but dangerous if
accessible
externally.
$ ftp 10.129.14.136

Connected to 10.129.14.136.
220 "Welcome to the HTB Academy vsFTP service."
Name (10.129.14.136:cry0l1t3): anonymous

230 Login successful.
Remote system type is UNIX.
Using binary mode to transfer files.

ftp>
Checking FTP Session Settings
ftp> status

Connected to 10.129.14.136.
No proxy connection.
Connecting using address family: any.
Mode: stream; Type: binary; Form: non-print; Structure: file
Verbose: on; Bell: off; Prompting: on; Globbing: on
Store unique: off; Receive unique: off
Case: off; CR stripping: on
Quote control characters: on
Ntrans: off
Nmap: off
Hash mark printing: off; Use of PORT cmds: on
Tick counter printing: off
ftp> debug
Debugging on (debug=1).

ftp> trace
Packet tracing on.
Hiding User/Group IDs
hide_ids=YES setting is a security measure designed to prevent local
system
usernames from being exposed in directory listings. If visible, these usernames could be used in brute-force
attacks against services like FTP or SSH. However, most modern infrastructures implement protection
mechanisms
such as fail2ban, which monitors failed login attempts and blocks IP
addresses after a certain threshold is reached.
ftp> ls
-rw-rw-r--    1 ftp     ftp      8138592 Sep 14 16:54 Calender.pptx
...
Recursive Directory Listing
ls_recurse_enable=YES, which enables recursive directory
listings. This allows us to enumerate the entire visible directory tree using ls -R
in
a single command. This feature is especially helpful for quickly mapping large file structures during FTP
enumeration.
ftp> ls -R
./Clients/HackTheBox:
-rw-r--r-- 1 ftp ftp appointments.xlsx
...

./Clients/Inlanefreight:
-rw-r--r-- 1 ftp ftp meetings.txt
-rw-r--r-- 1 ftp ftp proposal.pptx
...
Downloading a File via FTP
ftp> get Important/notes.txt

200 PORT command successful. Consider using PASV.
150 Opening BINARY mode data connection for Important Notes.txt (41 bytes).
226 Transfer complete.
Downloading All Available Files
wget with mirroring mode. This
can be noisy and may trigger alerts in well-monitored systems.
$ wget -m --no-passive ftp://anonymous:anonymous@10.129.14.136
$ tree .
.
└── 10.129.14.136
    ├── Calendar.pptx
    ├── Clients
    │   └── Inlanefreight
    │       ├── appointments.xlsx
    │       ├── contract.docx
    │       ├── meetings.txt
    │       └── proposal.pptx
    ├── Documents
    │   ├── appointments-template.xlsx
    │   ├── contract-template.docx
    │   └── contract-template.pdf
    ├── Employees
    └── Important Notes.txt
Uploading a File to the FTP Server
put command.
This can be extremely valuable in exploitation chains, e.g., uploading a malicious PHP or shell script to a
web-accessible directory.
$ touch testupload.txt
ftp> put testupload.txt

200 PORT command successful. Consider using PASV.
150 Ok to send data.
226 Transfer complete.
Footprinting the Service
Performing an FTP Service Scan
-sV, default scripts -sC, and aggressive mode
-A against port 21 provides extensive FTP information:
$ sudo nmap -sV -p21 -sC -A 10.129.14.136
PORT   STATE SERVICE VERSION
21/tcp open  ftp     vsftpd 2.0.8 or later
| ftp-anon: Anonymous FTP login allowed (FTP code 230)
| ftp-syst:
|   FTP server status:
|   vsFTPd 3.0.3 - secure, fast, stable
|   TYPE: ASCII
...
ftp-anon test for anonymous login and list accessible files, while
ftp-syst retrieves system status information using the STAT command. These insights help us
assess permissions, server version, session behavior, and exposed content.
SMB
Introduction
Server Message Block (SMB) is a client-server protocol that facilitates access to shared files, directories, and network resources such as printers and interfaces. SMB is used widely across Windows systems and is backward compatible, allowing communication between new and legacy Microsoft operating systems. SMB originated from network systems like LAN Manager and LAN Server on OS/2, and has since become integral to Windows networking.
With the open-source project Samba, SMB is also available on Linux and Unix systems, enabling cross-platform file sharing. SMB operates over TCP and follows a three-way handshake to establish connections between client and server. Once connected, SMB enables file and service access through structured request/response messages. A server can expose parts of its local file system as shares. These shares can be seen and accessed by clients with appropriate permissions, and their structure may not reflect the server’s actual directory layout. Access to SMB shares is regulated via Access Control Lists (ACLs), which define permissions such as read, execute, or full access for specific users or groups. These ACLs apply per share and may differ from the local permissions on the server itself.
As mentioned earlier, there is an alternative implementation of the SMB server called Samba, which is developed for Unix-based operating systems. Samba implements the Common Internet File System (CIFS) network protocol. CIFS is a dialect of SMB, meaning it is a specific implementation of the SMB protocol originally created by Microsoft. This allows Samba to communicate effectively with newer Windows systems. Therefore, it is often referred to as SMB/CIFS.
However, CIFS is considered a specific version of the SMB protocol, primarily aligning with SMB version 1. When SMB commands are transmitted over Samba to an older NetBIOS service, connections typically occur over TCP ports 137, 138, and 139. In contrast, CIFS operates over TCP port 445 exclusively. There are several versions of SMB, including newer versions like SMB 2 and SMB 3, which offer improvements and are preferred in modern infrastructures, while older versions like SMB 1 (CIFS) are considered outdated but may still be used in specific environments.
| SMB Version | Supported | Features |
|---|---|---|
| CIFS | Windows NT 4.0 | Communication via NetBIOS interface |
| SMB 1.0 | Windows 2000 | Direct connection via TCP |
| SMB 2.0 | Windows Vista, Windows Server 2008 | Performance upgrades, improved message signing, caching feature |
| SMB 2.1 | Windows 7, Windows Server 2008 R2 | Locking mechanisms |
| SMB 3.0 | Windows 8, Windows Server 2012 | Multichannel connections, end-to-end encryption, remote storage access |
| SMB 3.0.2 | Windows 8.1, Windows Server 2012 R2 | |
| SMB 3.1.1 | Windows 10, Windows Server 2016 | Integrity checking, AES-128 encryption |
With version 3, the Samba server gained the ability to be a full member of an Active Directory domain. With
version 4, Samba even provides an Active Directory domain controller. It contains several so-called daemons
for this purpose – which are Unix background programs. The SMB server daemon (smbd) provides
the
first two functionalities, while the NetBIOS message block daemon (nmbd) implements the last
two.
The SMB service controls these two background processes.
Samba is suitable for both Linux and Windows systems. In a network, each host participates in a workgroup, which is a group name used to organize computers and their resources on an SMB network. Multiple workgroups can coexist on the same network.
IBM developed the NetBIOS API to support communication between computers. In a NetBIOS environment, each host registers a name when it comes online, either independently or through a NetBIOS Name Server (NBNS). NBNS later evolved into the Windows Internet Name Service (WINS), which plays a similar role in resolving network names.
Default Settings
Samba offers a wide range of settings configured through the /etc/samba/smb.conf file. This
file
defines global configurations as well as per-share configurations, which may override global settings. A
filtered example of this configuration looks as follows:
[global]
   workgroup = DEV.INFREIGHT.HTB
   server string = DEVSMB
   log file = /var/log/samba/log.%m
   max log size = 1000
   logging = file
   panic action = /usr/share/samba/panic-action %d
   server role = standalone server
   obey pam restrictions = yes
   unix password sync = yes
   passwd program = /usr/bin/passwd %u
   passwd chat = *Enter\snew\s*\spassword:* %n\n *Retype\snew\s*\spassword:* %n\n *password\supdated\ssuccessfully* .
   pam password change = yes
   map to guest = bad user
   usershare allow guests = yes

[printers]
   comment = All Printers
   browseable = no
   path = /var/spool/samba
   printable = yes
   guest ok = no
   read only = yes
   create mask = 0700

[print$]
   comment = Printer Drivers
   path = /var/lib/samba/printers
   browseable = yes
   read only = yes
   guest ok = no
The [global] section applies server-wide settings, while each share (e.g.,
[printers]) can override specific options. Misconfigurations at the share level may lead to
significant security exposures.
| Setting | Description |
|---|---|
[sharename] |
The name of the network share. |
workgroup |
Appears when clients query the server. |
path |
Directory accessible through the share. |
server string |
Description shown during client connection. |
unix password sync |
Synchronize UNIX and SMB passwords. |
usershare allow guests |
Allow unauthenticated access to user shares. |
map to guest |
Define behavior for failed logins. |
browseable |
Show share in list of available shares. |
guest ok |
Allow access without a password. |
read only |
Restrict to read-only access. |
create mask |
Permissions for newly created files. |
Some Samba configurations, while convenient for users, can also open security risks. Let’s take
browseable = yes for example: it allows users to see all share names. While helpful for
employees, this also benefits attackers after gaining access.
| Setting | Description |
|---|---|
browseable = yes |
Allow listing of available shares. |
read only = no |
Permit file creation and modification. |
writable = yes |
Enable write access. |
guest ok = yes |
Permit guest access without authentication. |
enable privileges = yes |
Apply specific SID-based privileges. |
create mask = 0777 |
Set full permissions on new files. |
directory mask = 0777 |
Set full permissions on new directories. |
logon script |
Define a script to run at user login. |
magic script |
Run script upon file closure. |
magic output |
Store output from magic script. |
Misconfigurations in these options can expose sensitive directories, allow unauthorized access, or enable execution of scripts that may lead to privilege escalation or remote code execution.
We can create a custom share, such as [notes], and configure it with permissive options for
demonstration or internal use. These settings may be left enabled unintentionally, allowing easy access to
file listings and downloads during enumeration.
[notes]
  comment = CheckIT
  path = /mnt/notes/
  browseable = yes
  read only = no
  writable = yes
  guest ok = yes
  enable privileges = yes
  create mask = 0777
  directory mask = 0777
After modifying /etc/samba/smb.conf, the Samba service must be restarted:
$ sudo systemctl restart smbd
We can list all available shares using smbclient with null session access (-N):
$ smbclient -N -L //10.129.14.128
Sharename       Type      Comment
---------       ----      -------
print$          Disk      Printer Drivers
home            Disk      INFREIGHT Samba
dev             Disk      DEVenv
notes           Disk      CheckIT
IPC$            IPC       IPC Service (DEVSM)
Once inside the [notes] share, we can explore contents and use the help command to
list available operations:
$ smbclient //10.129.14.128/notes
Enter WORKGROUP\'s password:
Anonymous login successful
Try "help" to get a list of possible commands.

smb: \> help
smb: \> ls
We can download files with get, and execute local system commands using !:
smb: \> get prep-prod.txt
smb: \> !ls
smb: \> !cat prep-prod.txt
From the administrative point of view, we can monitor active SMB connections using the smbstatus command. It shows the Samba version, user sessions, host IPs, accessed shares, and connection status. This visibility is crucial, especially when dealing with isolated or internal subnets accessible by others.
$ smbstatus
In environments with domain-level security, the Samba server can operate as a domain
member.
Authentication is then managed by a domain controller, typically a Windows NT server. The
domain controller holds user credentials within NTDS.dit and the Security
Authentication
Module (SAM), authenticating users when they first log in and attempt to access shared resources
across the domain.
Footprinting
Although Nmap provides various NSE scripts for SMB enumeration, scans can be slow and sometimes limited in depth. Manual tools like rpcclient allow us to interact directly with the SMB service, revealing more detailed information.
$ sudo nmap 10.129.14.128 -sV -sC -p139,445 Starting Nmap 7.80 ( https://nmap.org ) at 2021-09-19 15:15 CEST Nmap scan report for sharing.inlanefreight.htb (10.129.14.128) Host is up (0.00024s latency). PORT STATE SERVICE VERSION 139/tcp open netbios-ssn Samba smbd 4.6.2 445/tcp open netbios-ssn Samba smbd 4.6.2 MAC Address: 00:00:00:00:00:00 (VMware) Host script results: |_nbstat: NetBIOS name: HTB, NetBIOS user:, NetBIOS MAC: (unknown) | smb2-security-mode: | 2.02: |_ Message signing enabled but not required | smb2-time: | date: 2021-09-19T13:16:04 |_ start_date: N/A Service detection performed. Please report any incorrect results at https://nmap.org/submit/ . Nmap done: 1 IP address (1 host up) scanned in 11.35 seconds
The scan confirms Samba is running on ports 139 and 445. NSE scripts identify basic SMB info, such as server version and time settings. However, to enumerate shares and users, we rely on rpcclient, which performs MS-RPC (Microsoft Remote Procedure Call) functions manually over SMB.
$ rpcclient -U "" 10.129.14.128

Enter WORKGROUP\'s password:
rpcclient $>
Below are some useful rpcclient queries and what they reveal:
| Query | Description |
|---|---|
srvinfo |
Basic server metadata |
enumdomains |
List domains visible to the server |
querydominfo |
Detailed info about domain and user counts |
netshareenumall |
Enumerate all available shares |
netsharegetinfo <share> |
Share-specific permissions and paths |
enumdomusers |
Enumerate all users in the domain |
queryuser <RID> |
Details on user properties and login metadata |
rpcclient $> enumdomusers

user:[mrb3n] rid:[0x3e8]
user:[cry0l1t3] rid:[0x3e9]
By retrieving user RIDs and querying them, we gain access to full user metadata. The following examples show detailed info for two users:
rpcclient $> queryuser 0x3e9

User Name   : cry0l1t3
Password last set Time: Mi, 22 Sep 2021 17:50:56 CEST
Home Drive  : \\devsmb\cry0l1t3
...
rpcclient $> queryuser 0x3e8

User Name   : mrb3n
Password last set Time: Mi, 22 Sep 2021 17:47:59 CEST
Home Drive  : \\devsmb\mrb3n
...
Anonymous access to RPC functions poses a critical risk, especially when user enumeration is possible. These accounts can become targets for brute-force attacks, particularly when security hygiene is weak and users choose guessable passwords.
Once we’ve enumerated users and gathered their RIDs, we can retrieve group-related information using querygroup <RID>. This allows us to understand user-group associations and their privileges.
rpcclient $> querygroup 0x201

Group Name:     None
Description:    Ordinary Users
Group Attribute:7
Num Members:2
Not all rpcclient commands may be available depending on access level, but
queryuser
usually works anonymously if the RID is valid. We can brute-force RIDs to enumerate users using a bash loop.
for i in $(seq 500 1100); do rpcclient -N -U "" 10.129.14.128 -c "queryuser 0x$(printf '%x\n' $i)" | grep "User Name\|user_rid\|group_rid" && echo ""; done
This brute-force method reveals users and their group IDs:
User Name   :   sambauser
user_rid    :   0x1f5
group_rid   :   0x201

User Name   :   mrb3n
user_rid    :   0x3e8
group_rid   :   0x201

User Name   :   cry0l1t3
user_rid    :   0x3e9
group_rid   :   0x201
Alternatively, we can use the Impacket tool samrdump.py, which automates user and RID enumeration:23
samrdump.py 10.129.14.128
This tool queries the SAMR interface and returns user account information, RIDs, password details, and whether accounts are disabled or active. It’s useful for passive reconnaissance and preparing brute-force attacks on known accounts.
To complement manual enumeration with rpcclient, there are several automated tools that can
greatly assist in identifying accessible shares, user information, and policies. Below are examples of three
powerful tools: SMBMap, CrackMapExec, and Enum4linux-NG.
SMBMap helps identify shared drives and their access permissions:
smbmap -H 10.129.14.128

[+] Finding open SMB ports....
[+] User SMB session established on 10.129.14.128...
[+] IP: 10.129.14.128:445       Name: 10.129.14.128
        Disk                                                    Permissions     Comment
        ----                                                    -----------     -------
        print$                                                  NO ACCESS       Printer Drivers
        home                                                    NO ACCESS       INFREIGHT Samba
        dev                                                     NO ACCESS       DEVenv
        notes                                                   NO ACCESS       CheckIT
        IPC$                                                    NO ACCESS       IPC Service (DEVSM)
CrackMapExec is used for SMB service fingerprinting and share enumeration with or without credentials:
crackmapexec smb 10.129.14.128 --shares -u '' -p ''

SMB         10.129.14.128   445    DEVSMB           [*] Windows 6.1 Build 0 (name:DEVSMB) (domain:) (signing:False) (SMBv1:False)
SMB         10.129.14.128   445    DEVSMB           [+] \:
SMB         10.129.14.128   445    DEVSMB           [+] Enumerated shares
SMB         10.129.14.128   445    DEVSMB           Share           Permissions     Remark
SMB         10.129.14.128   445    DEVSMB           -----           -----------     ------
SMB         10.129.14.128   445    DEVSMB           print$                          Printer Drivers
SMB         10.129.14.128   445    DEVSMB           home                            INFREIGHT Samba
SMB         10.129.14.128   445    DEVSMB           dev                             DEVenv
SMB         10.129.14.128   445    DEVSMB           notes           READ,WRITE      CheckIT
SMB         10.129.14.128   445    DEVSMB           IPC$                            IPC Service (DEVSM)
From the output, we can confirm read/write access to the notes share, while the rest are
inaccessible or read-only. This gives us a clear target for enumeration or exploitation.
Enum4linux-NG automates a large number of RPC and SMB queries This tool performs a full sweep of NetBIOS names, OS version, users, groups, shares, and password policies. It also checks for null sessions and share access. Some highlights from the results:
- Found users:
mrb3n,cry0l1t3 - Accessible shares:
notes,home - OS Detected: Windows 7 / Server 2008 R2
- Password policy: Minimum 5 chars, complexity not enforced
$ ./enum4linux-ng.py 10.129.14.128 -A

ENUM4LINUX - next generation

 ==========================
|    Target Information    |
 ==========================
[*] Target ........... 10.129.14.128
[*] Username ......... ''
[*] Random Username .. 'juzgtcsu'
[*] Password ......... ''
[*] Timeout .......... 5 second(s)

 =====================================
|    Service Scan on 10.129.14.128    |
 =====================================
[*] Checking LDAP
[-] Could not connect to LDAP on 389/tcp: connection refused
[*] Checking LDAPS
[-] Could not connect to LDAPS on 636/tcp: connection refused
[*] Checking SMB
[+] SMB is accessible on 445/tcp
[*] Checking SMB over NetBIOS
[+] SMB over NetBIOS is accessible on 139/tcp

 =====================================================
|    NetBIOS Names and Workgroup for 10.129.14.128    |
 =====================================================
[+] Got domain/workgroup name: DEVOPS
[+] Full NetBIOS names information:
- DEVSMB          <00> -         H   Workstation Service
- DEVSMB          <03> -         H   Messenger Service
- DEVSMB          <20> -         H   File Server Service
- ..__MSBROWSE__. <01> -  H   Master Browser
- DEVOPS          <00> -  H   Domain/Workgroup Name
- DEVOPS          <1d> -         H   Master Browser
- DEVOPS          <1e> -  H   Browser Service Elections
- MAC Address = 00-00-00-00-00-00

 ==========================================
|    SMB Dialect Check on 10.129.14.128    |
 ==========================================
[*] Trying on 445/tcp
[+] Supported dialects and settings:
SMB 1.0: false
SMB 2.02: true
SMB 2.1: true
SMB 3.0: true
SMB1 only: false
Preferred dialect: SMB 3.0
SMB signing required: false

 ==========================================
|    RPC Session Check on 10.129.14.128    |
 ==========================================
[*] Check for null session
[+] Server allows session using username '', password ''
[*] Check for random user session
[+] Server allows session using username 'juzgtcsu', password ''
[H] Rerunning enumeration with user 'juzgtcsu' might give more results

 ====================================================
|    Domain Information via RPC for 10.129.14.128    |
 ====================================================
[+] Domain: DEVOPS
[+] SID: NULL SID
[+] Host is part of a workgroup (not a domain)

 ============================================================
|    Domain Information via SMB session for 10.129.14.128    |
 ============================================================
[*] Enumerating via unauthenticated SMB session on 445/tcp
[+] Found domain information via SMB
NetBIOS computer name: DEVSMB
NetBIOS domain name: ''
DNS domain: ''
FQDN: htb

 ================================================
|    OS Information via RPC for 10.129.14.128    |
 ================================================
[*] Enumerating via unauthenticated SMB session on 445/tcp
[+] Found OS information via SMB
[*] Enumerating via 'srvinfo'
[+] Found OS information via 'srvinfo'
[+] After merging OS information we have the following result:
OS: Windows 7, Windows Server 2008 R2
OS version: '6.1'
OS release: ''
OS build: '0'
Native OS: not supported
Native LAN manager: not supported
Platform id: '500'
Server type: '0x809a03'
Server type string: Wk Sv PrQ Unx NT SNT DEVSM

 ======================================
|    Users via RPC on 10.129.14.128    |
 ======================================
[*] Enumerating users via 'querydispinfo'
[+] Found 2 users via 'querydispinfo'
[*] Enumerating users via 'enumdomusers'
[+] Found 2 users via 'enumdomusers'
[+] After merging user results we have 2 users total:
'1000':
  username: mrb3n
  name: ''
  acb: '0x00000010'
  description: ''
'1001':
  username: cry0l1t3
  name: cry0l1t3
  acb: '0x00000014'
  description: ''

 =======================================
|    Groups via RPC on 10.129.14.128    |
 =======================================
[*] Enumerating local groups
[+] Found 0 group(s) via 'enumalsgroups domain'
[*] Enumerating builtin groups
[+] Found 0 group(s) via 'enumalsgroups builtin'
[*] Enumerating domain groups
[+] Found 0 group(s) via 'enumdomgroups'

 =======================================
|    Shares via RPC on 10.129.14.128    |
 =======================================
[*] Enumerating shares
[+] Found 5 share(s):
IPC$:
  comment: IPC Service (DEVSM)
  type: IPC
dev:
  comment: DEVenv
  type: Disk
home:
  comment: INFREIGHT Samba
  type: Disk
notes:
  comment: CheckIT
  type: Disk
print$:
  comment: Printer Drivers
  type: Disk
[*] Testing share IPC$
[-] Could not check share: STATUS_OBJECT_NAME_NOT_FOUND
[*] Testing share dev
[-] Share doesn't exist
[*] Testing share home
[+] Mapping: OK, Listing: OK
[*] Testing share notes
[+] Mapping: OK, Listing: OK
[*] Testing share print$
[+] Mapping: DENIED, Listing: N/A

 ==========================================
|    Policies via RPC for 10.129.14.128    |
 ==========================================
[*] Trying port 445/tcp
[+] Found policy:
domain_password_information:
  pw_history_length: None
  min_pw_length: 5
  min_pw_age: none
  max_pw_age: 49710 days 6 hours 21 minutes
  pw_properties:
  - DOMAIN_PASSWORD_COMPLEX: false
  - DOMAIN_PASSWORD_NO_ANON_CHANGE: false
  - DOMAIN_PASSWORD_NO_CLEAR_CHANGE: false
  - DOMAIN_PASSWORD_LOCKOUT_ADMINS: false
  - DOMAIN_PASSWORD_PASSWORD_STORE_CLEARTEXT: false
  - DOMAIN_PASSWORD_REFUSE_PASSWORD_CHANGE: false
domain_lockout_information:
  lockout_observation_window: 30 minutes
  lockout_duration: 30 minutes
  lockout_threshold: None
domain_logoff_information:
  force_logoff_time: 49710 days 6 hours 21 minutes

 ==========================================
|    Printers via RPC for 10.129.14.128    |
 ==========================================
[+] No printers returned (this is not an error)

Completed after 0.61 seconds
No single tool gives us the complete picture. It is essential to cross-validate information using multiple enumeration tools and manual analysis. Automation speeds up discovery, but human logic is required to exploit findings effectively.
NFS
Introduction
Network File System (NFS) is a protocol developed by Sun Microsystems to allow file systems to be mounted and accessed remotely over a network. Its purpose is similar to SMB but uses a completely different implementation. NFS is commonly used between Unix and Linux systems, and is not compatible with SMB clients.
NFSv3 authenticates clients based on their IP or hostname, whereas NFSv4 introduces user-level authentication, similar to SMB, along with stateful operations, improved security, and support for ACLs and Kerberos.
| Version | Features |
|---|---|
| NFSv2 | Legacy version using UDP, minimal compatibility |
| NFSv3 | Supports variable file sizes, better error reporting, backward incompatible |
| NFSv4 | Kerberos support, firewall-friendly (port 2049), stateful protocol, ACLs |
| NFSv4.1 | pNFS (parallel access), session trunking, better scalability and performance |
NFS uses the ONC-RPC (Open Network Computing Remote Procedure Call) protocol over TCP/UDP
port 111, and the main service runs over port 2049. Data exchange is based on
XDR (External Data Representation) to ensure system-independent communication.
Authentication in NFS is handled at the RPC level, commonly relying on UID/GID mapping. This
can
be problematic if UID/GID values do not match between client and server. Since there is no robust
authorization enforcement on the server side, NFS should only be deployed in trusted internal
networks.
The lack of granular access control and reliance on system-level mappings makes NFS vulnerable if improperly
secured, especially when exported file systems are writable or root access is allowed (e.g., via
no_root_squash).
Default Settings
NFS is relatively straightforward to configure compared to FTP or SMB. The core configuration is handled
through the /etc/exports file, which defines the directories shared over the network and the
associated access permissions and restrictions.
Each line in the file specifies a path to export, followed by one or more clients and the options assigned
to
each.
cat /etc/exports

# Example for NFSv2 and NFSv3:
/srv/homes       hostname1(rw,sync,no_subtree_check) hostname2(ro,sync,no_subtree_check)

# Example for NFSv4:
/srv/nfs4        gss/krb5i(rw,sync,fsid=0,crossmnt,no_subtree_check)
/srv/nfs4/homes  gss/krb5i(rw,sync,no_subtree_check)
Below is a summary of the most common export options available:
| Option | Description |
|---|---|
| rw | Read and write permissions |
| ro | Read-only permissions |
| sync | Synchronous writes (safer, slower) |
| async | Asynchronous writes (faster, less safe) |
| secure | Requires requests from ports < 1024 |
| insecure | Allows requests from any port |
| no_subtree_check | Disables subtree verification |
| root_squash | Maps root to anonymous user to avoid root access |
Here's an example of how to share a directory with the whole subnet:
# Append share to /etc/exports
echo '/mnt/nfs  10.129.14.0/24(sync,no_subtree_check)' >> /etc/exports

# Restart NFS service
systemctl restart nfs-kernel-server

# Display current exports
exportfs

/mnt/nfs       10.129.14.0/24
In this example, the directory /mnt/nfs is shared with all hosts in the
10.129.14.0/24 subnet. These clients can mount the export and view its contents, depending on
additional permissions and UID/GID mapping.
As with other file-sharing protocols, NFS can introduce significant security risks if misconfigured. Some
options in the /etc/exports file may expose sensitive data or allow unauthorized access to the
system.
Below is a list of potentially dangerous NFS options that should be carefully reviewed before deployment:
| Option | Description |
|---|---|
| rw | Allows full read and write access to the exported directory. |
| insecure | Accepts connections from unprivileged ports (>1024), which can be abused by regular users. |
| nohide | Exposes mounted subdirectories beneath an exported directory, increasing visibility. |
| no_root_squash | Preserves the UID/GID 0 for the root user, giving full root access to clients. This is extremely risky. |
For example, the insecure option allows client connections using ports above 1024.
Normally,
only
the root user can bind to ports below 1024, so enabling insecure removes a basic privilege
check
and opens the door to non-root abuse of the NFS service.
Footprinting the Service
When footprinting NFS, the key ports to scan are 111 (rpcbind) and 2049
(nfs). The rpcinfo NSE script can enumerate available RPC services, their ports,
and
versions.
$ sudo nmap -p111,2049 -sV -sC 10.129.14.128
You can go further using --script nfs* to gather share info, mount points, permissions, and
file
system stats.
$ sudo nmap -p111,2049 -sV --script nfs* 10.129.14.128Mounting NFS Shares
To explore contents, create a local mount directory and attach the share:
$ showmount -e 10.129.14.128
$ mkdir target-NFS
$ sudo mount -t nfs 10.129.14.128:/ ./target-NFS/ -o nolock
Then, explore the mounted directory as if it were local:
$ tree target-NFSUnderstanding Ownership
You can list files to find owners and groups by name:
$ ls -l target-NFS/mnt/nfs/Or by UID/GID values:
$ ls -n target-NFS/mnt/nfs/Escalation via NFS
If root access is available but root_squash is not configured properly, it may be possible to
upload a binary with a SUID bit set to escalate privileges.
This is particularly useful if you can SSH into a system but want to run code as another user with readable access to files via the mounted share.
Cleanup
To unmount the NFS share when done:
$ cd ..
$ sudo umount ./target-NFS
DNS
Introduction
The Domain Name System (DNS) is a fundamental protocol of the Internet, designed to
translate
human-friendly domain names (e.g., www.google.com) into IP addresses (e.g., 142.250.190.105)
that
computers use to
identify each other on the network. Without DNS, users would have to memorize IP addresses instead of domain
names to access websites or services.
DNS operates as a decentralized, distributed system with no central database. Instead, it is composed of a hierarchy of name servers distributed globally. These servers work together to resolve domain names into IP addresses through a series of queries and referrals.
To better understand how DNS works, imagine it as a library where the books (IP addresses) are indexed by names (domain names), and there are multiple index sections (name servers) across different library branches (DNS zones).
DNS resolution relies on different types of servers that interact to complete a query. Each has a specific role in the resolution chain:
| Server Type | Description |
|---|---|
| DNS Root Server | Top of the DNS hierarchy. Root servers respond to queries for top-level domains (TLDs) such as
.com, .org, etc. There are 13 root server clusters distributed globally,
managed by ICANN.
|
| Authoritative Nameserver | Authoritative name servers hold authority for a particular zone. Holds definitive records for a domain or subdomain. Responds with final answers to queries about domains it manages. These servers are the ultimate source of truth for DNS data. |
| Non-authoritative Nameserver | Delivers DNS responses based on information retrieved and cached from authoritative sources. It does not own the DNS zone but can respond using previously gathered data. |
| Caching DNS Server | Stores DNS query results temporarily to reduce lookup times and network traffic. The authoritative name server determines the duration of this storage. |
| Forwarding Server | Relays DNS queries to an external DNS server instead of resolving them directly. Useful in corporate networks for monitoring and filtering DNS traffic. |
| Resolver | Typically runs on end-user machines or routers. Responsible for initiating and sequencing the DNS queries until a final response is received. |
DNS traffic is usually unencrypted, making it vulnerable to monitoring or tampering by ISPs or attackers on the same network. To mitigate this, protocols like DNS over TLS (DoT), DNS over HTTPS (DoH), and DNSCrypt were introduced to encrypt DNS queries and protect user privacy.
A fully qualified domain name (FQDN) is structured hierarchically. Here is an example breakdown:
- Root (.) – Implicit in every FQDN; the highest level in the DNS hierarchy.
- Top-Level Domain (TLD) – Examples:
.com,.org,.io. - Second-Level Domain – e.g.,
inlanefreight.com. - Subdomain – e.g.,
www.inlanefreight.com,dev.inlanefreight.com. - Host – Specific device within a subdomain, e.g.,
WS01.dev.inlanefreight.com.
DNS queries return different types of records depending on the information requested. Here are the most commonly used DNS record types:
| Record | Description |
|---|---|
| A | Returns an IPv4 address of the requested domain as a result. |
| AAAA | Returns an IPv6 address of the requested domain. |
| MX | Returns the responsible mail servers as a result. |
| NS | Returns the DNS servers (nameservers) of the domain. |
| TXT | This record can contain various information. The all-rounder can be used, e.g., to validate the Google Search Console or validate SSL certificates. In addition, SPF and DMARC entries are set to validate mail traffic and protect it from spam. |
| CNAME | This record serves as an alias for another domain name. If you want the domain www.hackthebox.eu to point to the same IP as hackthebox.eu, you would create an A record for hackthebox.eu and a CNAME record for www.hackthebox.eu. |
| PTR | The PTR record works the other way around (reverse lookup). It converts IP addresses into valid domain names. |
| SOA | Provides information about the corresponding DNS zone and email address of the administrative contact. |
The SOA (Start of Authority) record is critical for zone transfers and synchronization. It includes:
- Primary nameserver
- Email of the domain administrator (in DNS format with
.instead of@) - Serial number – used for versioning zone files
- Refresh, retry, expire – timings for secondary servers to sync
- TTL – how long DNS data is cached
dig soa www.google.com

; <<>> DiG 9.20.8-6-Debian <<>> soa www.google.com
;; global options: +cmd
;; Got answer:
;; ->>HEADER<<- opcode: QUERY, status: NOERROR, id: 7168
;; flags: qr rd ra; QUERY: 1, ANSWER: 0, AUTHORITY: 1, ADDITIONAL: 1

;; OPT PSEUDOSECTION:
; EDNS: version: 0, flags:; udp: 512
;; QUESTION SECTION:
;www.google.com.			IN	SOA

;; AUTHORITY SECTION:
google.com.		60	IN	SOA	ns1.google.com. dns-admin.google.com. 763712478 900 900 1800 60

;; Query time: 31 msec
;; SERVER: 212.230.135.2#53(212.230.135.2) (UDP)
;; WHEN: Wed May 28 09:45:45 CEST 2025
;; MSG SIZE  rcvd: 93
The SOA record here indicates that the primary server is ns1.google.com and the
administrative email is dns-admin@google.com. The dot . in the email field
is converted to @ when interpreted.
Default Settings
There are numerous ways to configure a DNS server depending on its role, environment, and intended usage. However, most DNS setups share a common structure based on three key file types:
- Local DNS configuration files – define server-wide and zone-specific behavior.
- Zone files – store DNS records for forward resolution of domain names.
- Reverse zone files – support reverse lookups, mapping IP addresses to hostnames.
On Linux-based systems, one of the most widely used DNS servers is BIND9 (Berkeley Internet
Name Domain). It is a full-featured, standards-compliant, and highly customizable DNS server.
BIND9 uses several local configuration files stored typically under /etc/bind/:
named.conf– master config file, includes other filesnamed.conf.options– global server optionsnamed.conf.local– user-defined zone configurationsnamed.conf.log– logging behavior
The named.conf file includes directives and options blocks that control the general behavior of
the DNS server. A distinction is made between global options and zone-specific options:
- Global options affect all zones and server-wide settings.
- Zone options only apply to the zone in which they are defined and override any global settings.
root@bind9:~# cat /etc/bind/named.conf.local

//
// Do any local configuration here
//

//include "/etc/bind/zones.rfc1918";

zone "domain.com" {
    type master;
    file "/etc/bind/db.domain.com";
    allow-update { key rndc-key; };
};
This file defines a DNS zone named domain.com of type master, meaning this server
is
the authoritative source. The zone data is stored in the corresponding zone file. Dynamic updates are
allowed
via a defined key.
Zone Files
A zone file is a plaintext file formatted using the BIND zone syntax. It describes a DNS zone and contains the authoritative DNS records for the domain. Each zone must contain exactly one SOA (Start of Authority) record and at least one NS (Name Server) record.
Syntax errors in a zone file can invalidate the entire zone and result in the DNS server returning
SERVFAIL responses to queries.
root@bind9:~# cat /etc/bind/db.domain.com

$ORIGIN domain.com.
$TTL 86400
@     IN     SOA    dns1.domain.com. hostmaster.domain.com. (
                    2001062501 ; serial
                    21600      ; refresh
                    3600       ; retry
                    604800     ; expire
                    86400 )    ; minimum TTL

      IN     NS     ns1.domain.com.
      IN     NS     ns2.domain.com.

      IN     MX     10     mx.domain.com.
      IN     MX     20     mx2.domain.com.

             IN     A       10.129.14.5

server1      IN     A       10.129.14.5
server2      IN     A       10.129.14.7
ns1          IN     A       10.129.14.2
ns2          IN     A       10.129.14.3

ftp          IN     CNAME   server1
mx           IN     CNAME   server1
mx2          IN     CNAME   server2
www          IN     CNAME   server2
This zone file defines various A records, CNAME aliases, MX records
for
mail routing, and the required SOA and NS records. These mappings allow DNS to
resolve hostnames to IP addresses and route services like email properly.
Reverse Name Resolution
Reverse DNS (rDNS) allows mapping an IP address back to a domain name using PTR records.
This
is essential for services like email validation, network troubleshooting, and security audits.
Reverse zones are structured using in-addr.arpa for IPv4 or ip6.arpa for IPv6. For
example, the IP address 10.129.14.5 would be represented as
5.14.129.10.in-addr.arpa.
root@bind9:~# cat /etc/bind/db.10.129.14

$ORIGIN 14.129.10.in-addr.arpa.
$TTL 86400
@     IN     SOA    dns1.domain.com. hostmaster.domain.com. (
                    2001062501 ; serial
                    21600      ; refresh
                    3600       ; retry
                    604800     ; expire
                    86400 )    ; minimum TTL

      IN     NS     ns1.domain.com.
      IN     NS     ns2.domain.com.

5     IN     PTR    server1.domain.com.
7     IN     MX     mx.domain.com.
The PTR record for IP address 10.129.14.5 maps it to
server1.domain.com. This enables reverse lookups, which are often used in logging, access
controls, and mail server validation.
Dangerous Settings
DNS servers are often attractive targets for attackers due to their critical role in Internet infrastructure and their historically permissive default configurations. Misconfigured settings can unintentionally expose sensitive information or allow unauthorized actions such as zone transfers, data leakage, cache poisoning, or amplification attacks.
The BIND9 DNS server, while widely used and maintained, has a long history of vulnerabilities. Public vulnerability databases like CVE Details track such flaws, and security portals such as SecurityTrails provide practical insights into common DNS attack vectors.
In complex environments, administrators may sometimes prioritize functionality over security to resolve operational issues quickly. This approach often leads to insecure configurations that remain unnoticed until actively exploited. Below are some of the most sensitive options within the BIND9 configuration that require strict access control:
| Option | Description |
|---|---|
allow-query |
Specifies which IP addresses are allowed to query the DNS server. If not properly restricted, any external host can enumerate the server’s records. |
allow-recursion |
Controls which clients can perform recursive queries. Enabling this for all clients allows DNS amplification attacks. |
allow-transfer |
Defines which hosts can request zone transfers. If left open, attackers can retrieve the full DNS zone and map internal infrastructure. |
zone-statistics |
Enables collection of DNS statistics. While useful for monitoring, it may leak operational information if exposed externally. |
These settings should always be scoped down to trusted IP addresses and network segments. Below is a secure
example configuration snippet for named.conf.options:
options {
    allow-query { 192.168.0.0/16; 127.0.0.1; };
    allow-recursion { 192.168.0.0/16; };
    allow-transfer { none; };
    zone-statistics no;
};
Leaving any of these options open to the internet without proper restriction exposes the server to data exfiltration, infrastructure mapping, and abuse as part of DDoS amplification attacks. Secure DNS server configuration should follow the principle of least privilege and be reinforced by monitoring, logging, and timely patching of software components like BIND.
Footprinting
DNS footprinting involves querying DNS servers to extract valuable information about a domain's infrastructure. These queries may include name servers, version disclosures, records enumeration, and zone transfers. Attackers and penetration testers alike use DNS footprinting to map a target organization.
Querying NS Records
The NS record shows the authoritative name servers for a domain. Using the @
symbol
with dig, you can query a specific DNS server:
$ dig ns inlanefreight.htb @10.129.14.128Version Disclosure via CHAOS Class
Some DNS servers expose their version through a CH TXT query to version.bind:
$ dig CH TXT version.bind @10.129.120.85Enumerating with ANY Record
Querying with ANY may return multiple records the server is willing to disclose:
$ dig any inlanefreight.htb @10.129.14.128Zone Transfer (AXFR)
If the DNS server allows it, you can perform a full zone transfer using the AXFR query type.
This
reveals all records in the zone:
$ dig axfr inlanefreight.htb @10.129.14.128Zone Transfer - Internal Zones
Poor configurations can expose internal hostnames and IPs if internal zones are also transferable:
$ dig axfr internal.inlanefreight.htb @10.129.14.128Subdomain Enumeration (Brute Force)
Brute forcing possible subdomains using wordlists like SecLists can reveal active hosts:
$ for sub in $(cat subdomains.txt); do dig $sub.inlanefreight.htb @10.129.14.128; doneAutomated Tool: DNSenum
DNSenum automates DNS footprinting: NS lookups, brute-forcing subdomains, and AXFR attempts.
$ dnsenum --dnsserver 10.129.14.128 --enum -p 0 -s 0 -o subdomains.txt \
    -f /opt/seclists/Discovery/DNS/subdomains-top1million-110000.txt inlanefreight.htb
Combining these techniques provides a comprehensive view of a domain’s DNS landscape, which can be used to identify exposed assets or misconfigurations.
SMTP
Introduction
The Simple Mail Transfer Protocol (SMTP) is a protocol used for sending email messages across IP networks. It operates as a client-server protocol and is utilized both between email clients and servers and between servers themselves. SMTP servers traditionally listen on TCP port 25. However, for client submissions requiring authentication and encryption, ports like 587 (with STARTTLS) or 465 (with implicit SSL/TLS) are often used.
During transmission, the client sends the sender and recipient addresses, message content, and various headers. The receiving server forwards the email until it reaches the destination, where it is delivered to the recipient's mailbox via the Mail Delivery Agent (MDA). The following agents take part in email delivery:
- Mail User Agent (MUA) – The email client that composes and sends the message.
- Mail Submission Agent (MSA) – Validates and submits the message.
- Mail Transfer Agent (MTA) – Routes and relays the message between servers.
- Mail Delivery Agent (MDA) – Delivers the message to the recipient’s mailbox.
Messages pass from MUA ➞ MSA ➞ MTA ➞ MDA ➞ Mailbox. The MSA is also known as a relay. Incorrectly configured MTAs may become open relays, enabling mass spam campaigns.
MUA
(Client - user's app)
(Client - user's app)
➡️
MSA
(Sender - submits message)
(Sender - submits message)
➡️
MTA
(Transfer)
(Transfer)
➡️
MDA
(Deliverer)
(Deliverer)
➡️
Mailbox
(Destination)
(Destination)
SMTP does not inherently use encryption. All headers, commands, and authentication credentials are sent in plaintext unless additional security is applied. STARTTLS upgrades a plaintext connection to an encrypted one, protecting sensitive information during transit.
Modern SMTP servers use the ESMTP (Extended SMTP) extension, which supports features such
as
STARTTLS and AUTH PLAIN. These help protect against unauthorized access and
provide
secure authentication.
Spam prevention is implemented through authentication and reputation-based controls, including:
- SPF (Sender Policy Framework) – Defines authorized sending IPs for a domain.
- DKIM (DomainKeys Identified Mail) – Signs email headers to verify sender integrity.
- DMARC (Domain-based Message Authentication, Reporting & Conformance) – Specifies handling policies for SPF/DKIM failures.
SMTP suffers from two main limitations:
- Lack of Delivery Confirmation – Notifications for delivery success are inconsistent and usually returned as generic error messages.
- No Sender Verification – SMTP does not verify sender identity at the protocol level, which enables spoofing and mass spam abuse via open relays.
Proper configuration of authentication mechanisms and transport encryption is essential to secure SMTP communication and prevent exploitation.
Default Settings
SMTP servers like Postfix can be configured in various ways depending on the operational
needs and security
requirements. By default, their primary role is to send and relay emails through a network of mail agents.
The /etc/postfix/main.cf file contains critical server parameters. Below is a minimal and
common
example with comments and empty lines removed:
smtpd_banner = ESMTP Server
# Defines the initial greeting banner shown to clients when they connect to the SMTP server.

biff = no
# Disables the 'biff' service, which would notify users of new mail—generally not used.

append_dot_mydomain = no
# Prevents the server from automatically appending the domain name to addresses without a domain.

readme_directory = no
# Disables the default path for Postfix readme files, often used for documentation.

compatibility_level = 2
# Sets compatibility with newer Postfix behavior, ensuring modern standards.

smtp_tls_session_cache_database = btree:${data_directory}/smtp_scache
# Defines the cache database for TLS sessions using the B-tree format.

myhostname = mail1.inlanefreight.htb
# Sets the fully qualified domain name of the mail server.

alias_maps = hash:/etc/aliases
# Defines where to find alias mappings for user redirection (e.g., root → admin).

alias_database = hash:/etc/aliases
# Specifies where the alias database is built from (same as alias_maps).

smtp_generic_maps = hash:/etc/postfix/generic
# Allows rewriting of sender addresses—useful for masquerading internal users.

mydestination = $myhostname, localhost
# Lists the domains that this machine considers as local and will deliver mail for.

masquerade_domains = $myhostname
# Rewrites the domain part of the sender's address to look like it's from the hostname.

mynetworks = 127.0.0.0/8 10.129.0.0/16
# Specifies trusted networks allowed to relay mail without authentication.

mailbox_size_limit = 0
# Sets the maximum mailbox size; 0 means unlimited.

recipient_delimiter = +
# Allows email addressing with tags (e.g., user+tag@domain.com).

smtp_bind_address = 0.0.0.0
# Configures the server to bind to all available interfaces.

inet_protocols = ipv4
# Restricts the server to use only IPv4 (no IPv6).

smtpd_helo_restrictions = reject_invalid_hostname
# Rejects connections from clients that send an invalid hostname in the HELO/EHLO command.

home_mailbox = /home/postfix
# Specifies the mailbox location for local delivery.
SMTP Command Overview
| Command | Description |
|---|---|
| AUTH PLAIN | Authenticates a user to the server. |
| HELO | Starts the SMTP session by identifying the client hostname. |
| MAIL FROM | Specifies the sender's email address. |
| RCPT TO | Specifies the recipient's email address. |
| DATA | Begins the transfer of the email content. |
| RSET | Resets the session without closing the connection. |
| VRFY | Attempts to verify if a recipient exists. |
| EXPN | Expands a mailing list to show actual recipients. |
| NOOP | Sends a no-operation signal to keep the connection alive. |
| QUIT | Ends the SMTP session. |
Telnet Example: HELO/EHLO
$ telnet 10.129.14.128 25

Trying 10.129.14.128...
Connected to 10.129.14.128.
Escape character is '^]'.
220 ESMTP Server

HELO mail1.inlanefreight.htb

250 mail1.inlanefreight.htb

EHLO mail1

250-mail1.inlanefreight.htb
250-PIPELINING
250-SIZE 10240000
250-ETRN
250-ENHANCEDSTATUSCODES
250-8BITMIME
250-DSN
250-SMTPUTF8
250 CHUNKING
VRFY Command Usage
Used to enumerate valid usernames. May return code 252 even for non-existent users, depending on configuration:
VRFY root
VRFY cry0l1t3
VRFY testuser
Through Web Proxy
SMTP can also be accessed through HTTP proxies using a CONNECT command:
CONNECT 10.129.14.128:25 HTTP/1.0Send an Email Manually
The entire SMTP transaction can be performed from the command line using telnet:
$ telnet 10.129.14.128 25

Trying 10.129.14.128...
Connected to 10.129.14.128.
Escape character is '^]'.
220 ESMTP Server

EHLO inlanefreight.htb

250-mail1.inlanefreight.htb
250-PIPELINING
250-SIZE 10240000
250-ETRN
250-ENHANCEDSTATUSCODES
250-8BITMIME
250-DSN
250-SMTPUTF8
250 CHUNKING

MAIL FROM: <cry0l1t3@inlanefreight.htb>

250 2.1.0 Ok

RCPT TO: <mrb3n@inlanefreight.htb> NOTIFY=success,failure

250 2.1.5 Ok

DATA

354 End data with <CR><LF>.<CR><LF>

From: <cry0l1t3@inlanefreight.htb>
To: <mrb3n@inlanefreight.htb>
Subject: DB
Date: Tue, 28 Sept 2021 16:32:51 +0200
Hey man, I am trying to access our XY-DB but the creds don't work.
Did you make any changes there?
.

250 2.0.0 Ok: queued as 6E1CF1681AB

QUIT

221 2.0.0 Bye
Connection closed by foreign host.
Email Headers
Email headers contain metadata like sender/recipient, timestamps, subject, content type, and the email's path. Though not always visible in user interfaces, headers are critical for tracing and debugging email issues. Headers follow the structure defined in RFC 5322 and are accessible by both sender and receiver.
Dangerous Settings
SMTP misconfigurations can open the door to serious vulnerabilities such as email spoofing, spam relaying, and unauthorized message submission. One of the most critical misconfigurations is the presence of an open relay.
Open Relay Explained
An open relay is an SMTP server that accepts and forwards email messages from any source to any destination. These servers can be abused by spammers and threat actors to send forged messages and hide their identity.
To ensure reliable delivery, some administrators misconfigure their SMTP server to accept emails from all IP ranges. This often occurs when the admin is unsure which specific subnets or hosts need permission, especially in large or dynamic environments.
mynetworks = 0.0.0.0/0This configuration effectively whitelists the entire Internet. Any unauthenticated user can connect and send messages, including spam, phishing emails, or spoofed messages that appear to come from trusted sources.
Security Implications
- Email Spoofing: Attackers can forge the sender address to impersonate users or organizations.
- Spam Campaigns: The server may be blacklisted, damaging reputation and delivery rates.
- Data Leakage: Relayed emails can be intercepted or logged, exposing sensitive information.
Relay servers should require authentication (SMTP-AUTH) and be restricted to trusted internal
networks. Always define specific IP ranges and enforce STARTTLS where possible.
A secure example would be:
mynetworks = 127.0.0.0/8, 10.129.0.0/16
smtpd_recipient_restrictions = permit_mynetworks, reject_unauth_destination
These settings ensure only trusted internal clients can relay messages, and all others are rejected unless explicitly permitted.
Footprinting
SMTP footprinting is the process of gathering information about a mail server’s configuration, features, and
potential vulnerabilities. Tools like Nmap can be used to identify supported commands, detect
if
the server is an open relay, and expose misconfigurations.
Identify Available SMTP Commands
Using the smtp-commands NSE script, Nmap performs an EHLO command to list all commands accepted
by the target SMTP server:
$ sudo nmap 10.129.14.128 -sC -sV -p25Example output:
|_smtp-commands: mail1.inlanefreight.htb, PIPELINING, SIZE 10240000, VRFY, ETRN, ENHANCEDSTATUSCODES, 8BITMIME, DSN, SMTPUTF8, CHUNKINGDetecting Open Relay Vulnerabilities
The smtp-open-relay NSE script tests if the target SMTP server can be exploited as an open
relay.
It runs 16 different test cases to verify relaying behavior:
$ sudo nmap 10.129.14.128 -p25 --script smtp-open-relay -vExample findings:
| smtp-open-relay: Server is an open relay (16/16 tests)
|  MAIL FROM:<> -> RCPT TO:
|  MAIL FROM: -> RCPT TO:
|  MAIL FROM: -> RCPT TO:
|_ MAIL FROM: -> RCPT TO:
If the server allows relaying for all tested permutations, it is highly vulnerable and can be misused for
spam
or phishing attacks.
Regular audits using Nmap and secure configuration of parameters like mynetworks and
smtpd_recipient_restrictions are essential to ensure the SMTP server is not acting as an open
relay.
IMAP / POP3
Introduction
IMAP (Internet Message Access Protocol) allows clients to manage and synchronize emails directly on the server. Unlike POP3 (Post Office Protocol version 3), which only supports downloading and deleting emails, IMAP enables remote folder structures and simultaneous multi-client access, offering a networked file system experience for emails.
IMAP operates on port 143 (or 993 for SSL/TLS-encrypted connections) and uses ASCII-based commands. Clients can issue multiple commands asynchronously and receive confirmations tagged with identifiers. Authentication occurs immediately after the connection is established.
POP3, on the other hand, is more limited. It supports basic operations like listing, retrieving, and deleting messages. It downloads emails to the local client and typically removes them from the server unless configured otherwise.
A key advantage of IMAP is the ability to store sent emails in a centralized folder accessible from all devices. Clients can also work in offline mode, synchronizing changes once reconnected.
Without encryption, IMAP and POP3 transmit all data—including login credentials—in plaintext, which poses significant security risks. For this reason, modern mail servers enforce the use of SSL/TLS.
Default Settings
Both IMAP and POP3 provide extensive configuration options. These are typically defined within the
/etc/dovecot directory when using Dovecot. To experiment locally, install the packages:
sudo apt install dovecot-imapd dovecot-pop3d
You can then configure the protocols independently and test connectivity using tools like
telnet
or openssl.
Ports Summary
| Protocol | Default Port | Encrypted Port |
|---|---|---|
| IMAP | 143 | 993 (IMAPS) |
| POP3 | 110 | 995 (POP3S) |
For advanced inspection and interaction, you can use:
# Connect with SSL to IMAP
openssl s_client -connect 10.129.14.128:993

# Connect with SSL to POP3
openssl s_client -connect 10.129.14.128:995
IMAP Commands
| Command | Description |
|---|---|
| 1 LOGIN username password | User's login. |
| 1 LIST "" * | Lists all directories. |
| 1 CREATE "INBOX" | Creates a mailbox with a specified name. |
| 1 DELETE "INBOX" | Deletes a mailbox. |
| 1 RENAME "ToRead" "Important" | Renames a mailbox. |
| 1 LSUB "" * | Returns subscribed folders. |
| 1 SELECT INBOX | Selects a mailbox for access. |
| 1 UNSELECT INBOX | Exits the selected mailbox. |
| 1 FETCH <ID> all | Retrieves data of a specific message. |
| 1 CLOSE | Deletes messages flagged as Deleted. |
| 1 LOGOUT | Closes the IMAP session. |
POP3 Commands
| Command | Description |
|---|---|
| USER username | Identifies the user. |
| PASS password | Authenticates the user. |
| STAT | Returns number of emails and total size. |
| LIST | Lists all messages with their sizes. |
| RETR id | Retrieves an email by its ID. |
| DELE id | Deletes an email by its ID. |
| CAPA | Lists supported capabilities. |
| RSET | Resets deleted message marks. |
| QUIT | Ends the POP3 session. |
Dangerous Settings
Misconfigured IMAP or POP3 servers can lead to serious data leaks. While many organizations rely on secure
third-party providers like Google or Microsoft, some maintain their own mail servers to retain full control
over email privacy. Improper configurations can allow attackers to log in anonymously, view debug output, or
even intercept user credentials and emails. Below are some configuration options commonly found in
/etc/dovecot/dovecot.conf or included files that could expose sensitive information if not
handled carefully.
| Setting | Description |
|---|---|
auth_debug |
Enables all authentication debug logging. May expose internal authentication logic. |
auth_debug_passwords |
Logs password authentication details including plaintext or hashed passwords. Dangerous in production environments. |
auth_verbose |
Logs all unsuccessful authentication attempts and reasons, which can help attackers refine brute-force methods. |
auth_verbose_passwords |
Logs submitted passwords. Optional truncation, but still exposes password input if enabled. |
auth_anonymous_username |
Defines the username used during anonymous logins via the SASL ANONYMOUS mechanism. Can allow access without credentials if enabled. |
As always, debug features should only be used in controlled environments and never enabled on production mail servers exposed to the internet. A misstep here could leak authentication secrets, expose inbox contents, or provide attackers with useful reconnaissance data.
Footprinting
By default, IMAP and POP3 services run on ports 143 and 110 respectively,
while their encrypted counterparts use 993 for IMAP over SSL/TLS and 995
for
POP3 over SSL/TLS. These services can be fingerprinted using nmap to extract banners,
capabilities, and certificate information.
sudo nmap 10.129.14.128 -sV -p110,143,993,995 -sCcURL Interaction
We can interact directly with IMAP over SSL using curl with the imaps:// scheme
and
the --user flag:
curl -k 'imaps://10.129.14.128' --user user:p4ssw0rd
Adding -v shows handshake details, certificate chain, TLS version, and server response.
curl -k 'imaps://10.129.14.128' --user cry0l1t3:1234 -vOpenSSL - POP3 over SSL
openssl s_client -connect 10.129.14.128:995OpenSSL - IMAP over SSL
openssl s_client -connect 10.129.14.128:993
Once the session is established, IMAP commands such as CAPABILITY, LOGIN, and
LIST "" * can be executed manually to enumerate mail folders and features. This low-level
interaction can help us understand how different mail clients work under the hood and identify
misconfigurations like overly permissive authentication or weak credentials.
SNMP
Introduction
SNMP (Simple Network Management Protocol) is a protocol designed to monitor and manage network devices such as routers, switches, servers, and IoT equipment. In addition to device monitoring, SNMP can also handle remote configuration tasks. The current version, SNMPv3, enhances security but also adds complexity.
SNMP exchanges both information and control commands using agents via UDP port 161. Clients can set or change values on devices. Furthermore, SNMP supports unsolicited notifications called traps over UDP port 162, allowing servers to inform clients of specific events without prior requests.
Addressing and OID
SNMP requires all objects to have unique addresses, known as Object Identifiers (OIDs), for
accurate data exchange. These OIDs are structured hierarchically and represent nodes in a tree. Each OID is
a sequence of integers (e.g., 1.3.6.1.2.1) that helps locate and interpret specific data
points.
Management Information Base (MIB)
To ensure vendor-agnostic compatibility, the Management Information Base (MIB) was introduced. MIBs are text files written in ASN.1 syntax and define all queryable SNMP objects in a hierarchical tree. Each object includes an OID, name, access rights, data type, and description. MIBs do not contain data themselves but provide the structure for interpreting it.
SNMP Versions
- SNMPv1: Basic version without authentication or encryption. All data, including community strings, is sent in plaintext.
- SNMPv2c: Community-based version with minor improvements. Still lacks encryption and authentication.
- SNMPv3: Introduces robust security with username/password authentication and encrypted communication. More complex configuration.
Community Strings
Community strings act as passwords to control access to SNMP data. Common defaults like public
or private are often misconfigured. Since SNMPv1 and v2c send these strings unencrypted, they
can be easily intercepted on the network, making them a common target in security assessments.
Default Settings
The default SNMP daemon configuration file defines key parameters such as IP bindings, ports, MIBs, OIDs, authentication methods, and community strings.
Sample Configuration
Nemesis30@htb[/htb]$ cat /etc/snmp/snmpd.conf | grep -v "#" | sed -r '/^\s*$/d'

sysLocation    Sitting on the Dock of the Bay
sysContact     Me <me@example.org>
sysServices    72
master  agentx
agentaddress  127.0.0.1,[::1]
view   systemonly  included   .1.3.6.1.2.1.1
view   systemonly  included   .1.3.6.1.2.1.25.1
rocommunity  public default -V systemonly
rocommunity6 public default -V systemonly
rouser authPrivUser authpriv -V systemonly
These settings define what parts of the MIB tree can be accessed and how, including which community strings are allowed and under what conditions.
Dangerous Settings
| Setting | Description |
|---|---|
rwuser noauth |
Provides full access to the OID tree without requiring authentication. |
rwcommunity <community string> <IPv4 address> |
Grants full write access from any IPv4 source if the string matches. |
rwcommunity6 <community string> <IPv6 address> |
Same as rwcommunity, but for IPv6 sources. |
Footprinting
To enumerate SNMP, we can use tools like snmpwalk, onesixtyone, and braa. These tools allow querying, brute-forcing community strings, and OID enumeration.
SNMPwalk
snmpwalk is used to recursively query all available OIDs from a target using a known community
string.
Nemesis30@htb[/htb]$ snmpwalk -v2c -c public 10.129.14.128
...
iso.3.6.1.2.1.1.6.0 = STRING: "Sitting on the Dock of the Bay"
iso.3.6.1.2.1.25.6.3.1.2.1246 = STRING: "python3-apt_2.0.0ubuntu0.20.04.6_amd64"
When misconfigured, SNMP can reveal sensitive system information like installed packages, OS version, hostname, contact emails, etc.
OneSixtyOne
onesixtyone is a fast community string brute-forcer. It can test thousands of possible
community names from a wordlist.
Nemesis30@htb[/htb]$ sudo apt install onesixtyone
Nemesis30@htb[/htb]$ onesixtyone -c /opt/useful/seclists/Discovery/SNMP/snmp.txt 10.129.14.128

Scanning 1 hosts, 3220 communities
10.129.14.128 [public] Linux htb 5.11.0-37-generic ...
Braa
braa is used for bulk OID enumeration once a valid community string is known.
Nemesis30@htb[/htb]$ sudo apt install braa
Nemesis30@htb[/htb]$ braa public@10.129.14.128:.1.3.6.*

10.129.14.128:20ms:.1.3.6.1.2.1.1.1.0:Linux htb 5.11.0-34-generic ...
10.129.14.128:20ms:.1.3.6.1.2.1.1.4.0:mrb3n@inlanefreight.htb
...
Misconfigurations can make SNMP a goldmine for attackers. It's recommended to set up a local VM and experiment with these tools for hands-on practice.
MySQL
Introduction
MySQL is an open-source relational database management system (RDBMS) developed and supported by Oracle. It follows the client-server model, where the MySQL server handles data storage and distribution in tables, and clients can query or modify the data using structured SQL queries.
MySQL Clients
MySQL clients interact with the server by sending SQL queries to insert, update, delete, or retrieve data. Depending on the setup, access can be local or remote, allowing multiple clients to issue simultaneous queries.
A common example is WordPress, which uses MySQL to store posts, users, passwords, and configuration
settings. Typically, the database is only accessible from localhost for security reasons.
MySQL Databases
MySQL is well-suited for dynamic web applications due to its efficiency and speed. It is often used in a LAMP stack (Linux, Apache, MySQL, PHP) or LEMP stack (with Nginx instead of Apache).
Common types of data stored in MySQL databases include:
| Category | Examples |
|---|---|
| User data | Passwords, emails, permissions |
| Website content | Texts, forms, links, meta tags |
| Access control | Admins, roles, sensitive information |
While MySQL can technically store plaintext passwords, they are typically hashed by PHP scripts using secure one-way encryption techniques before storage.
MySQL Commands
SQL commands can display, modify, insert, or delete table rows. Additionally, SQL can alter table structures, manage indexes and user permissions. Query errors may expose valuable information about the database structure, which is often leveraged in SQL injection attacks.
MariaDB
MariaDB is a fork of the original MySQL codebase, created by the lead developer of MySQL after Oracle acquired MySQL AB. It maintains full compatibility and continues to be developed as a fully open-source alternative.
Default Settings
Managing SQL databases is a complex discipline. In fact, entire professions such as Database Administrator (DBA) focus solely on this task. Databases scale quickly in size and complexity, making proper configuration and planning essential. Understanding how to deploy and secure a MySQL or MariaDB instance is a fundamental skill for both software developers and security analysts.
Default MySQL Configuration
Nemesis30@htb[/htb]$ sudo apt install mysql-server -y
Nemesis30@htb[/htb]$ cat /etc/mysql/mysql.conf.d/mysqld.cnf | grep -v "#" | sed -r '/^\s*$/d'

[client]
port        = 3306
socket      = /var/run/mysqld/mysqld.sock

[mysqld_safe]
pid-file    = /var/run/mysqld/mysqld.pid
socket      = /var/run/mysqld/mysqld.sock
nice        = 0

[mysqld]
skip-host-cache
skip-name-resolve
user        = mysql
pid-file    = /var/run/mysqld/mysqld.pid
socket      = /var/run/mysqld/mysqld.sock
port        = 3306
basedir     = /usr
datadir     = /var/lib/mysql
tmpdir      = /tmp
lc-messages-dir = /usr/share/mysql
explicit_defaults_for_timestamp

symbolic-links=0

!includedir /etc/mysql/conf.d/
This configuration defines how the MySQL server runs: its port (3306), socket file, data
directories, and other system-level behaviors. It also avoids hostname lookups for performance
(skip-name-resolve) and disables symbolic links for security (symbolic-links=0).
Dangerous Settings
Several MySQL server settings can significantly impact security if misconfigured. Administrators should consult the MySQL reference documentation to understand the full scope of available options. Below are some of the most critical settings with security implications:
| Setting | Description |
|---|---|
user |
Defines the system user under which the MySQL service runs. |
password |
Specifies the password for the MySQL user. Often stored in plain text. |
admin_address |
The IP address used to accept administrative TCP/IP connections. |
debug |
Controls the debugging output. Can reveal sensitive internal information. |
sql_warnings |
Enables informational messages on warnings during SQL execution. |
secure_file_priv |
Restricts the file system paths used for import/export operations. |
Settings such as user, password, and admin_address are especially
risky if configuration files are world-readable or if an attacker has file read access. These values are
typically in plaintext, which can expose credentials and enable full database compromise.
Settings like debug and sql_warnings may also leak valuable debugging information,
such as query structures or backend paths. Such output, if displayed in web applications, can assist
attackers in identifying SQL injection vulnerabilities or even achieving remote command execution, as
demonstrated in modules like SQL Injection Fundamentals and SQLMap Essentials.
Footprinting
There are many reasons why a MySQL server might be accessible over an external network. However, exposing it
this way is far from a best practice. Often, such exposure is due to temporary settings forgotten by
administrators or used as a workaround for technical issues. MySQL servers typically run on TCP port
3306, and we can use tools like nmap to fingerprint the service.
$ sudo nmap 10.129.14.128 -sV -sC -p3306 --script mysql*
Scripts like mysql-enum, mysql-empty-password, and mysql-brute can
help determine default or weak credentials. Be cautious—some results might be false positives. You should
always validate them manually.
$ mysql -u root -h 10.129.14.132

ERROR 1045 (28000): Access denied for user 'root'@'10.129.14.1' (using password: NO)
If valid credentials are found (e.g., from brute-forcing or leaked files), we can authenticate and interact directly with the database server:
$ mysql -u root -pP4SSw0rd -h 10.129.14.128
Once connected, we can enumerate databases, tables, and data using standard SQL commands. Some important
system databases include information_schema and sys.
| Command | Description |
|---|---|
mysql -u <user> -p<password> -h <IP> |
Connect to the MySQL server. No space between -p and the password. |
show databases; |
List all available databases. |
use <database>; |
Select a database to work with. |
show tables; |
List all tables within the selected database. |
show columns from <table>; |
Show all columns of a table. |
select * from <table>; |
View all rows in a table. |
select * from <table> where <column> = "<value>"; |
Query specific records from a table using conditions. |
CONTACT